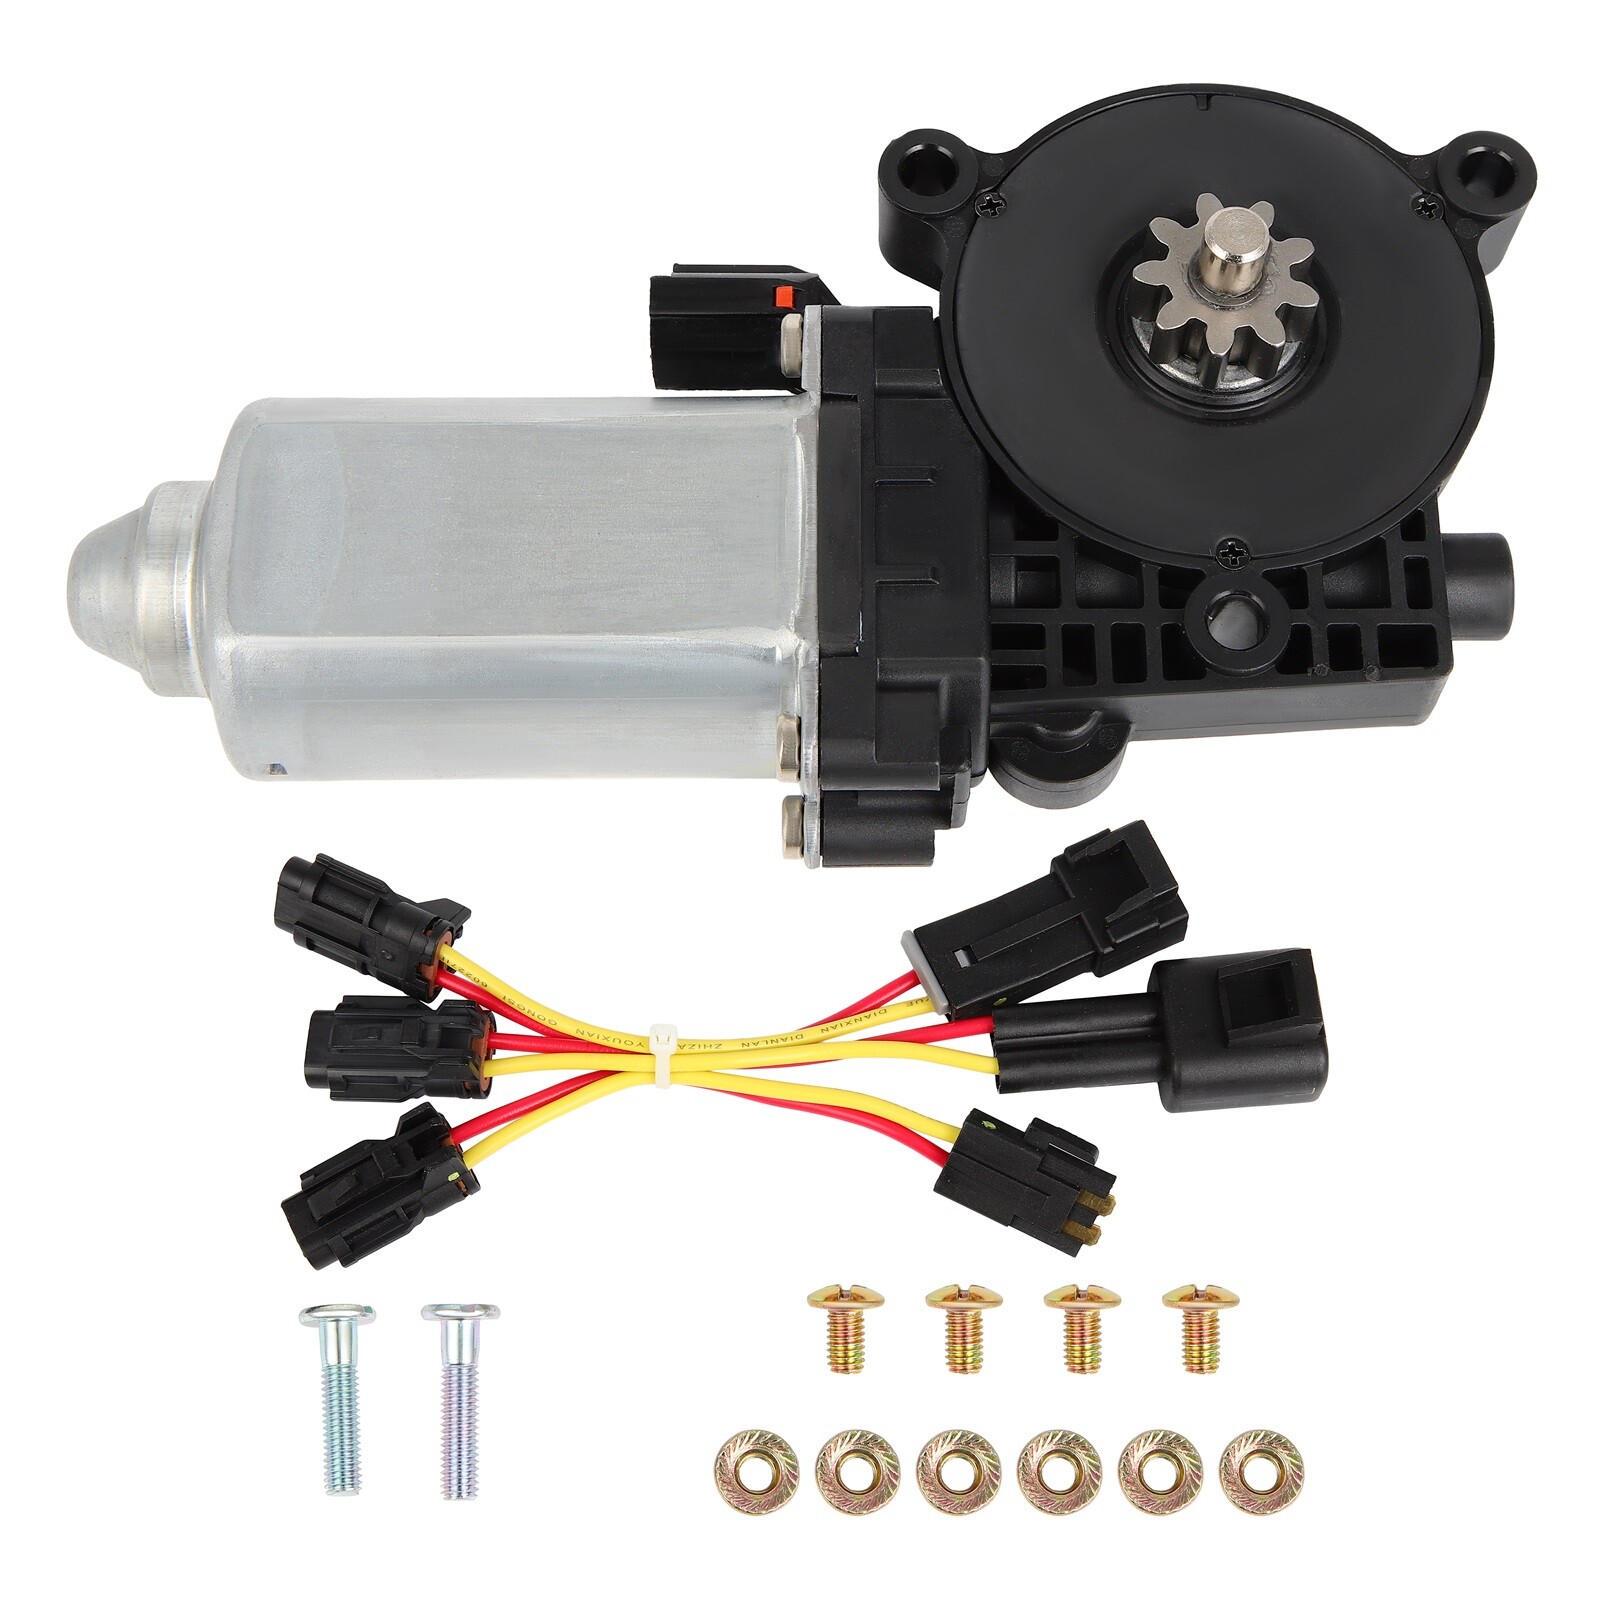
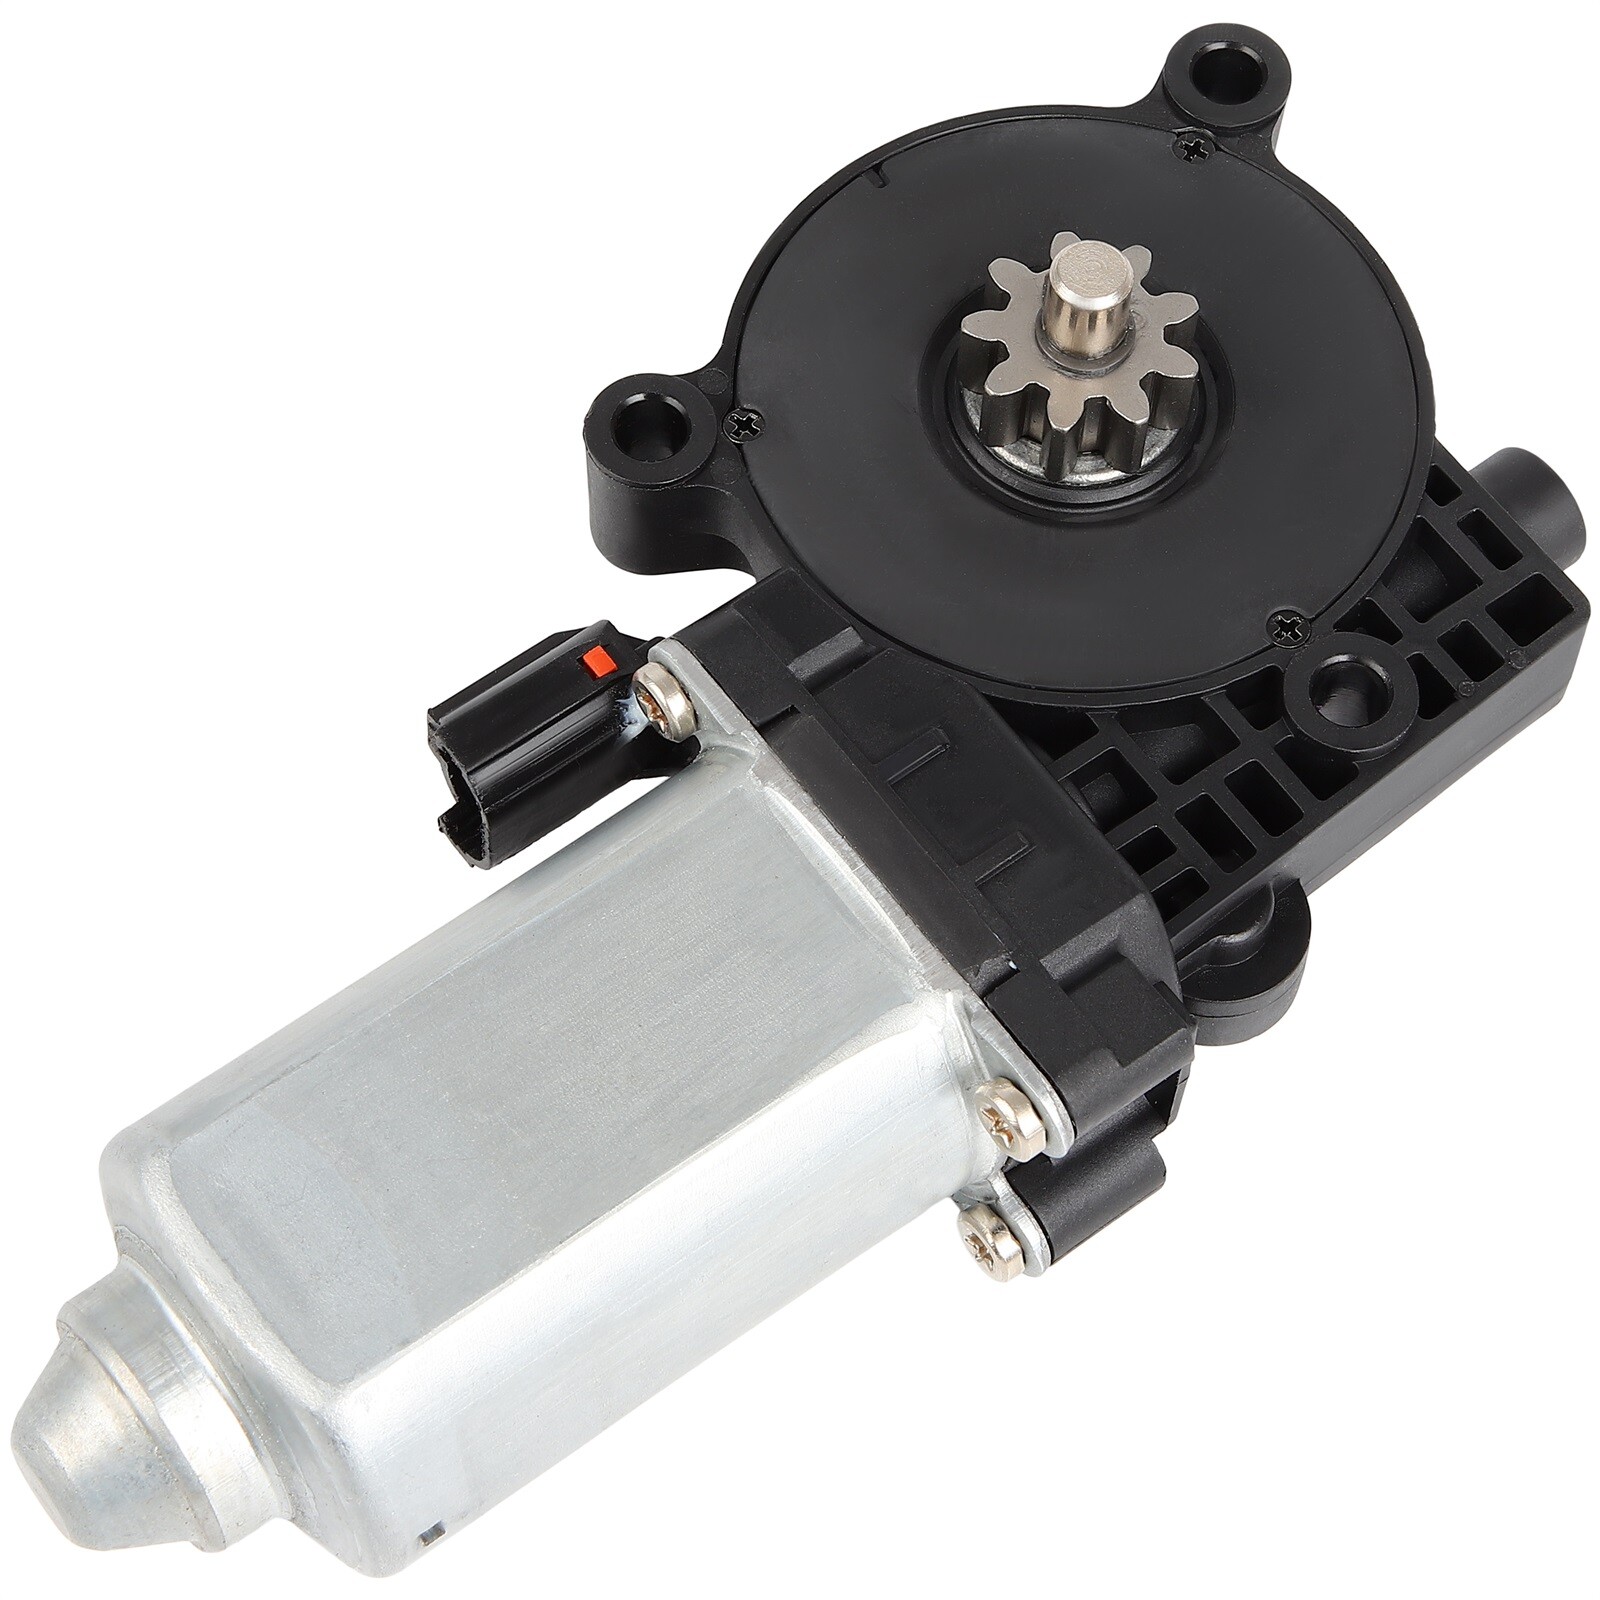
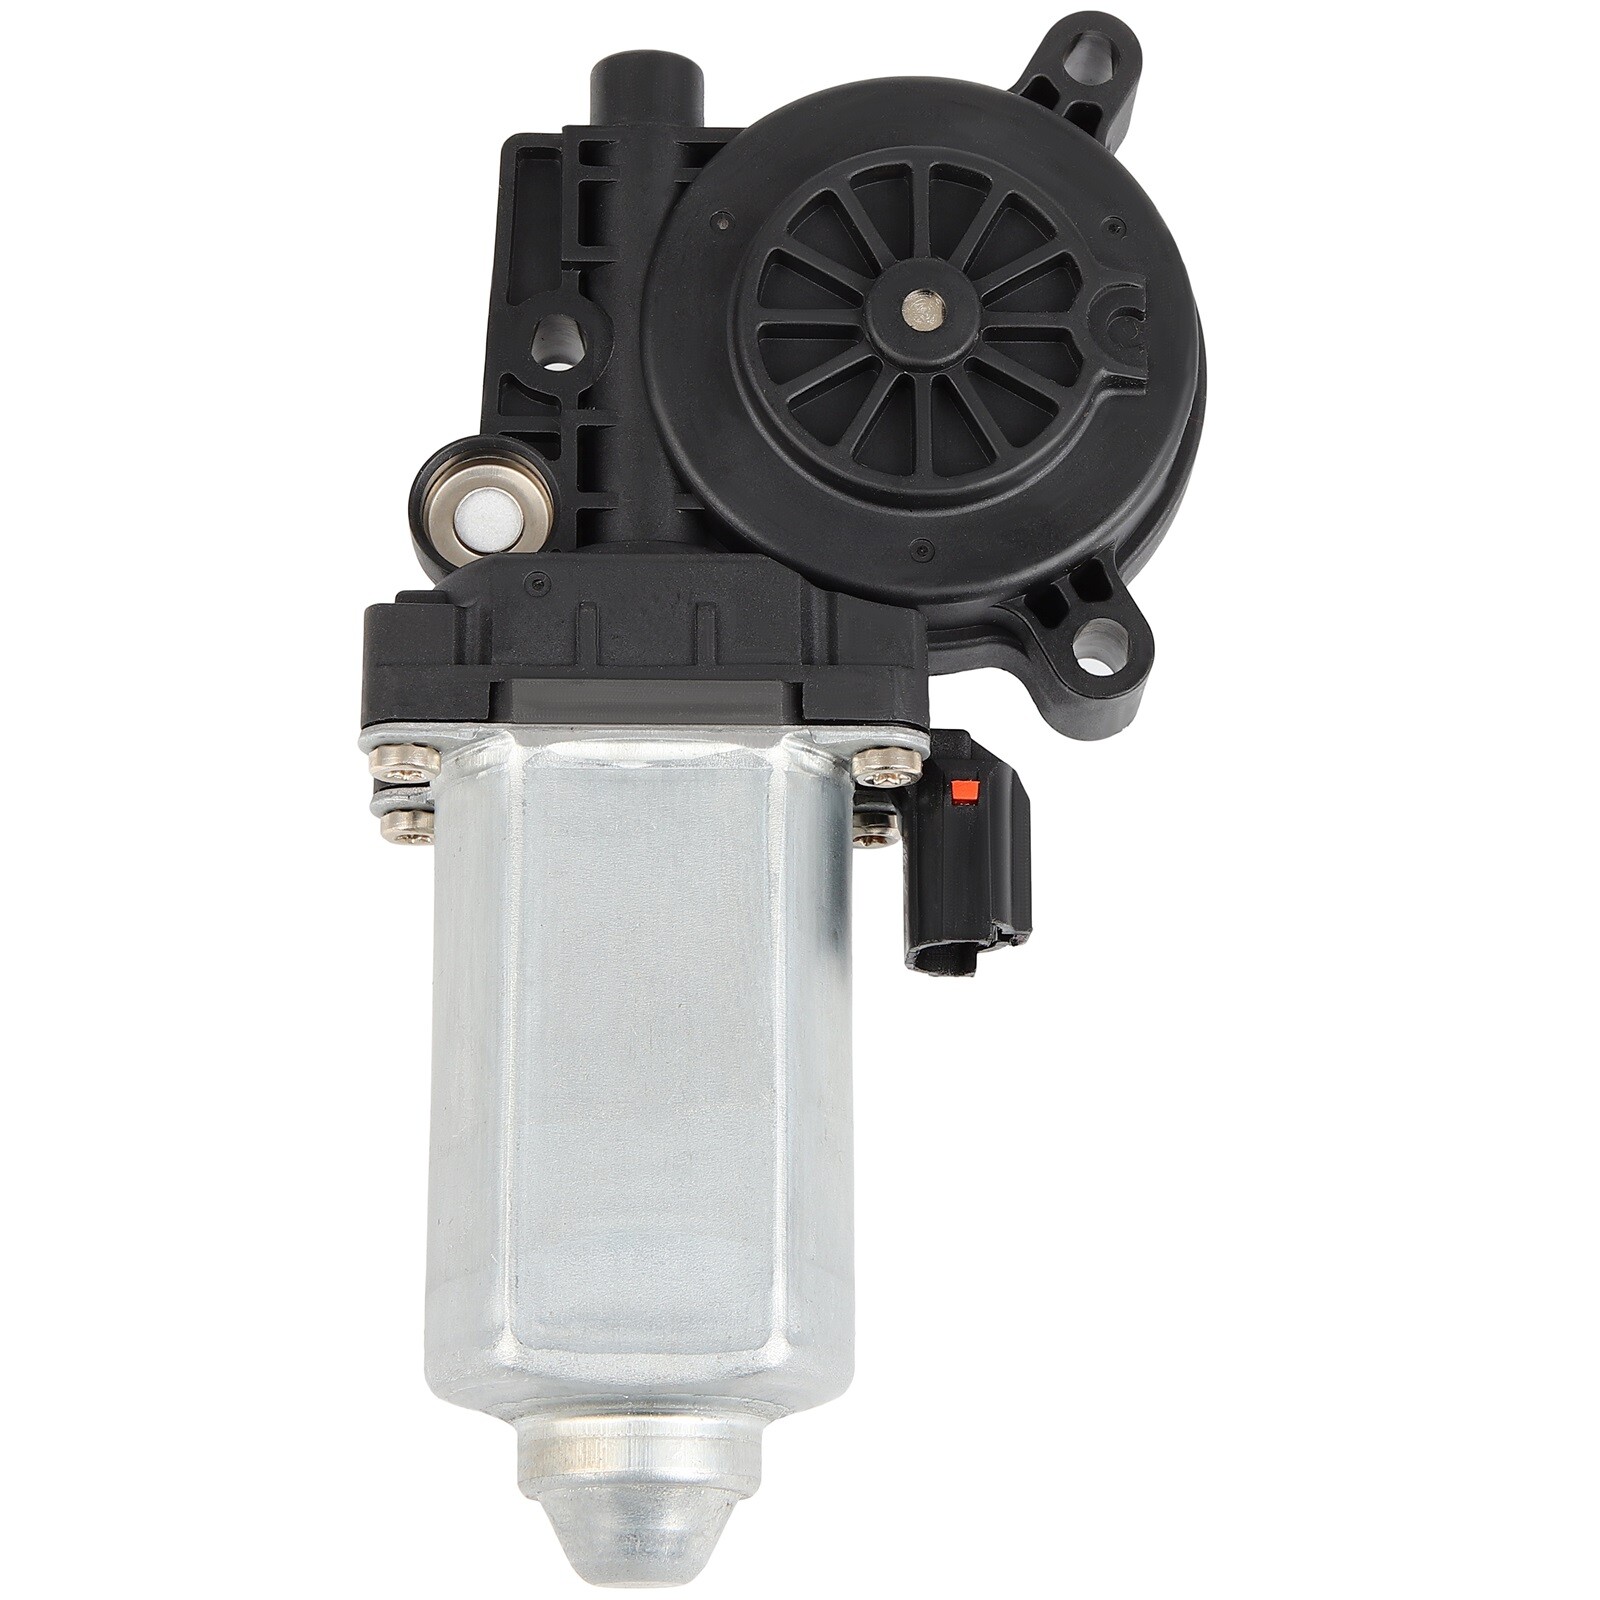
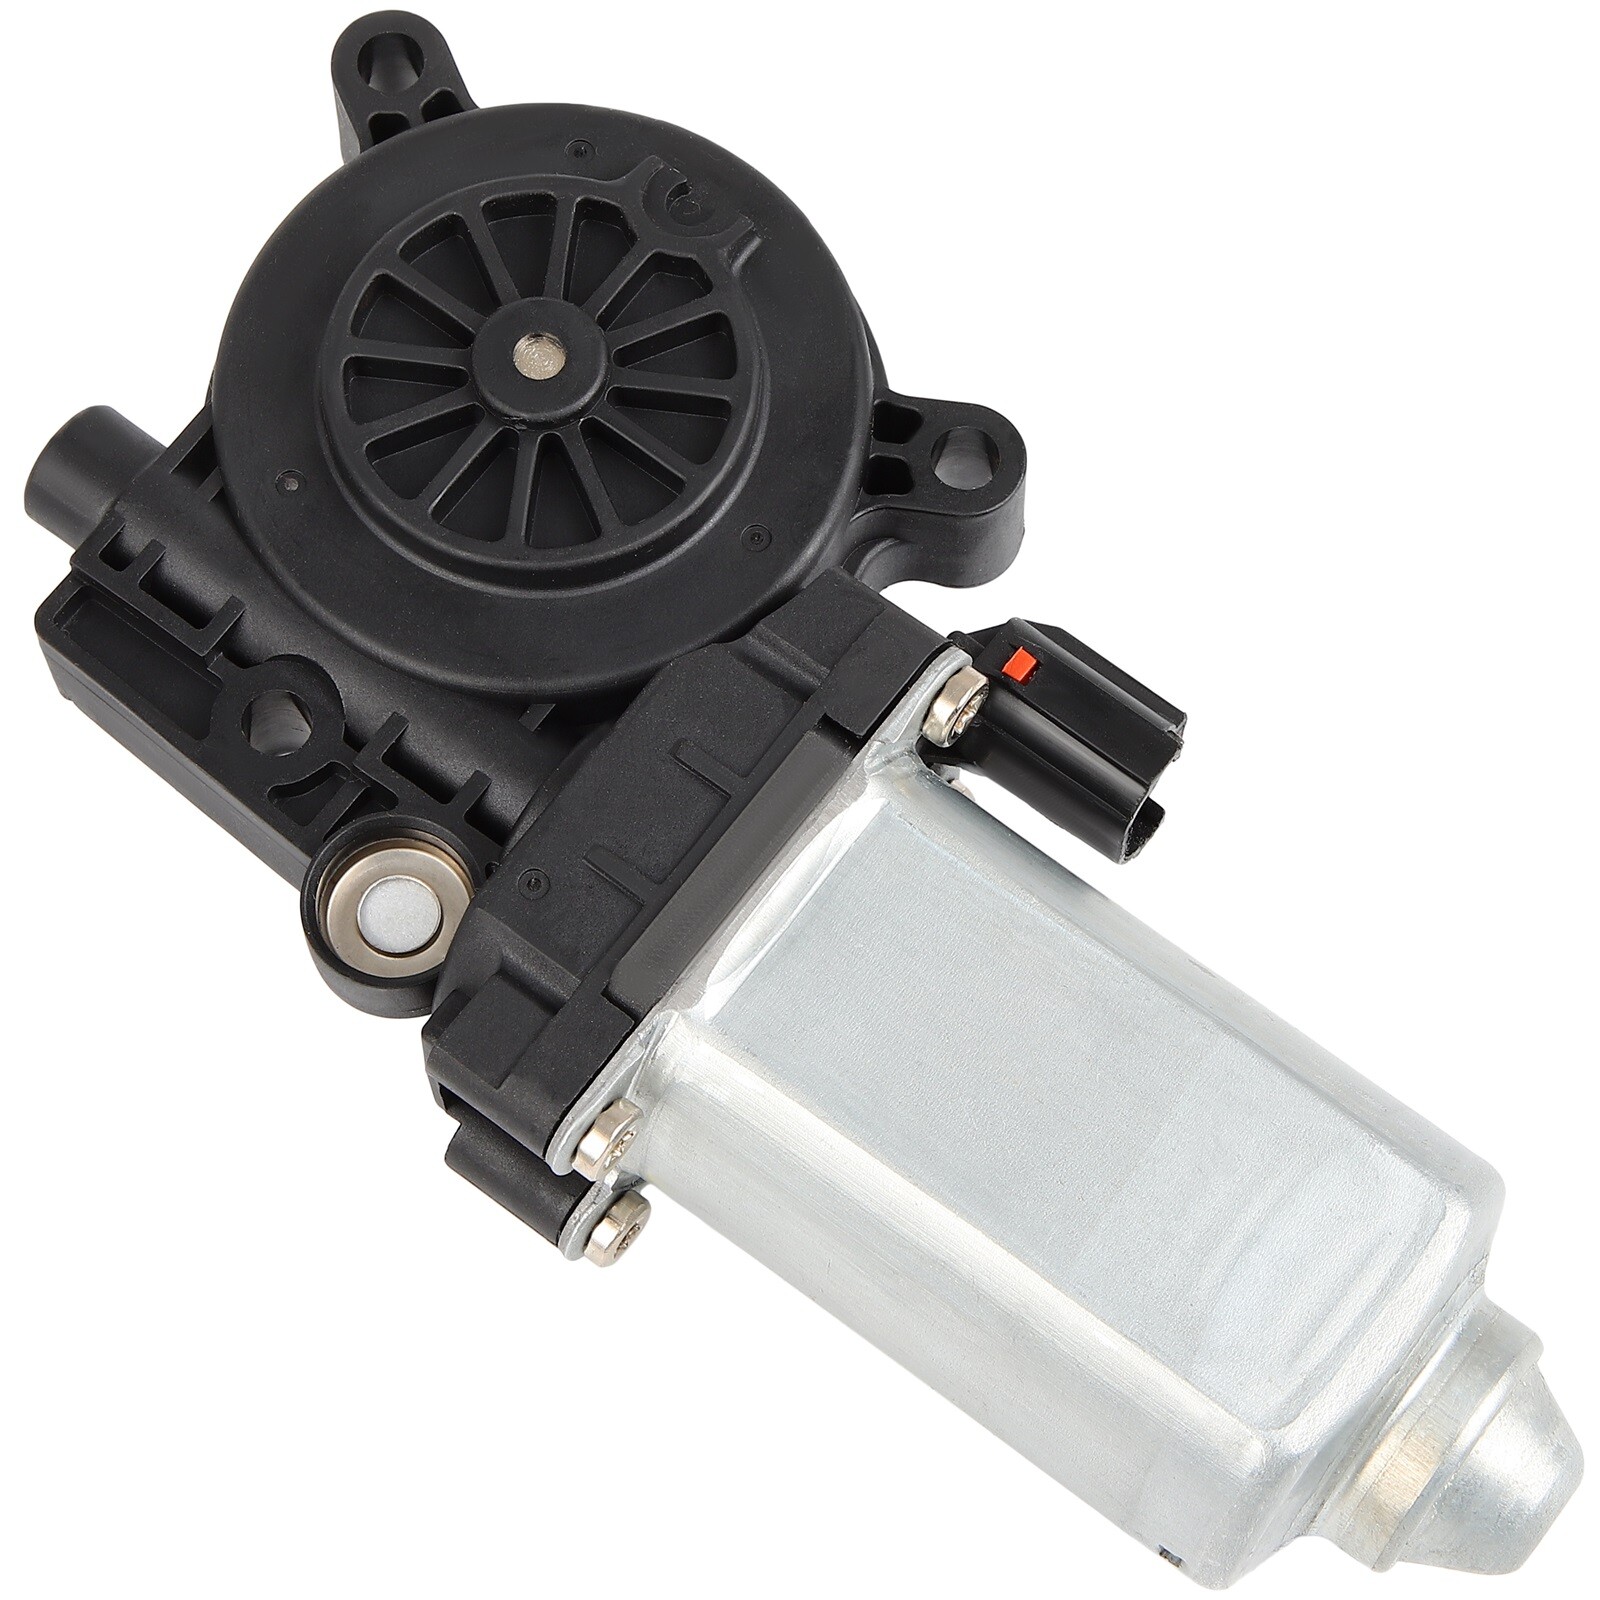
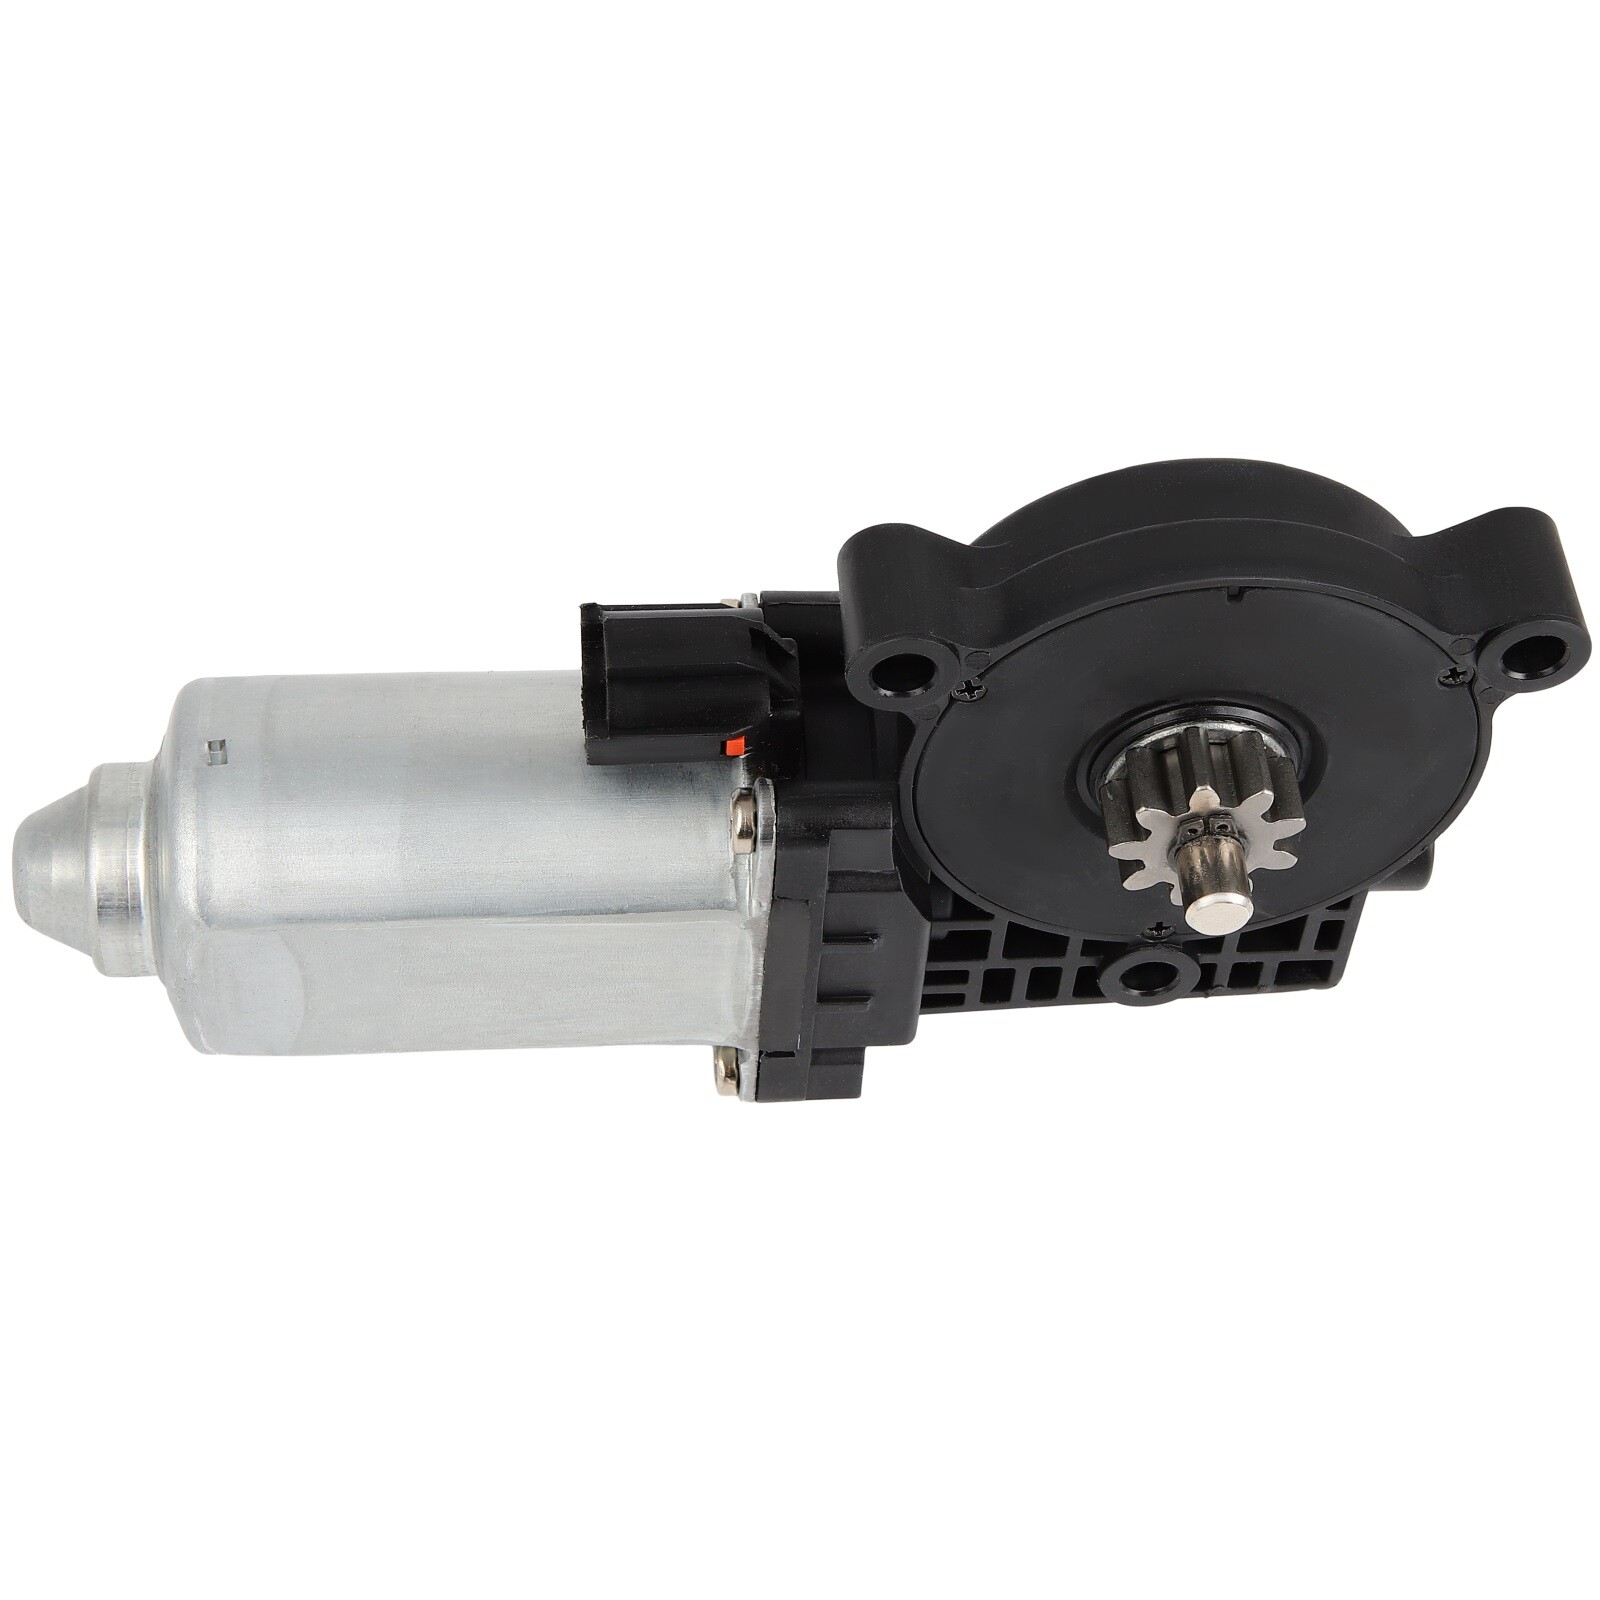
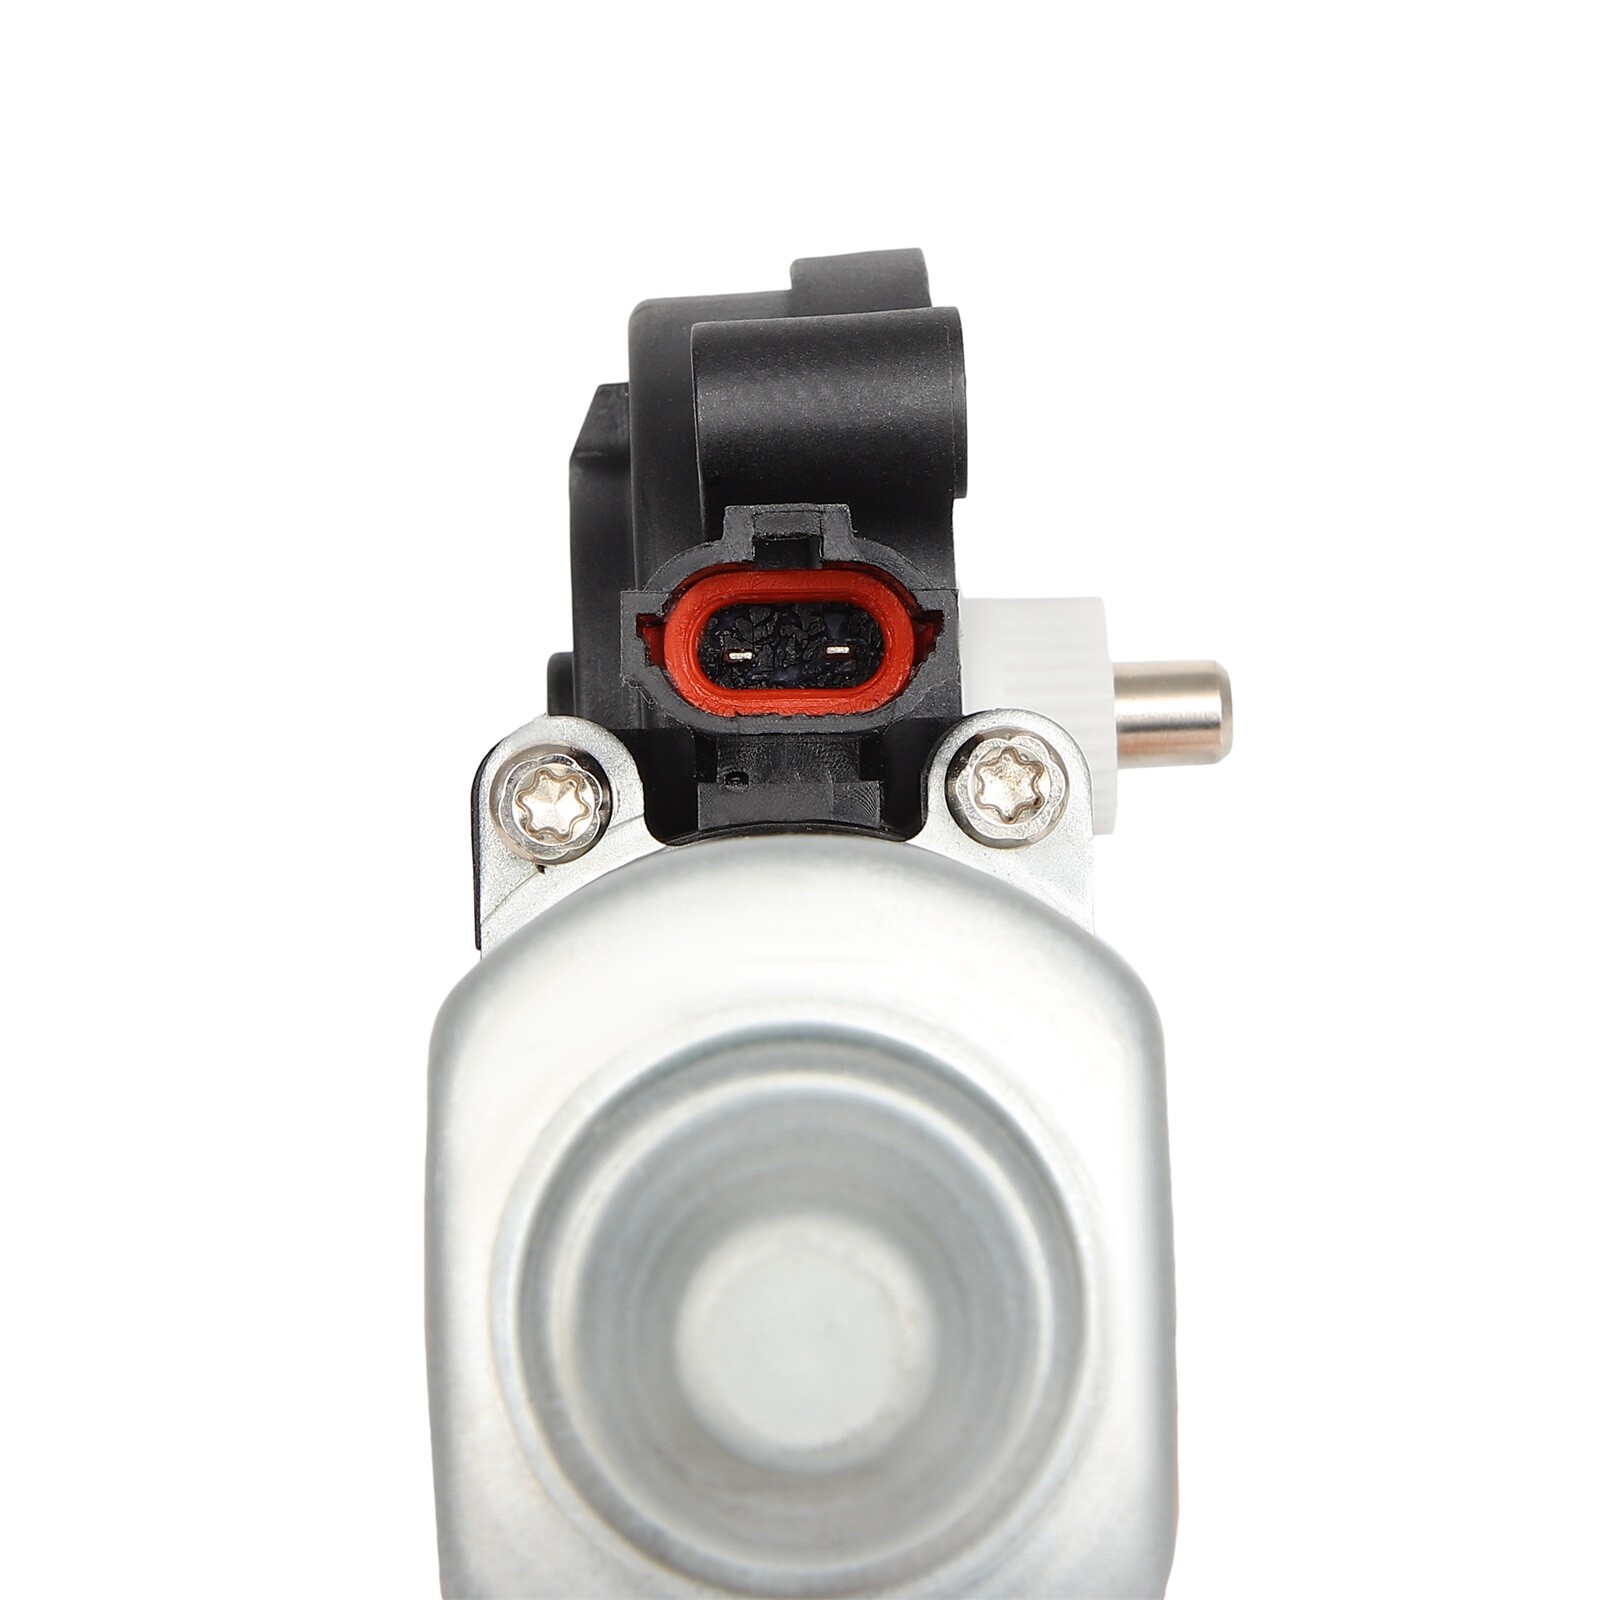
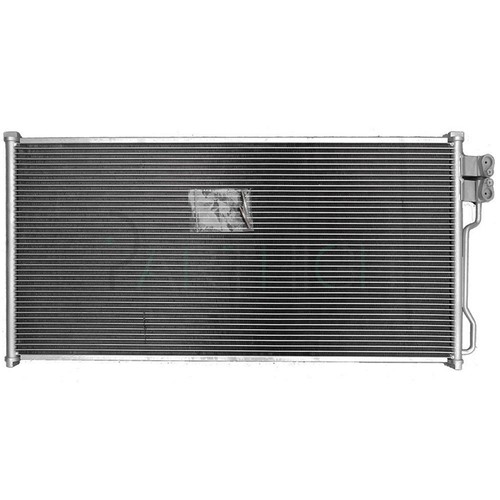
parthigh For 2003-2007 Chevy Express 1500 2500 Front Driver Power Window Motor 742-142
parthigh For 2003-2007 Chevy Express 1500 2500 Front Driver Power Window Motor 742-142


parthigh For 2003-2007 Chevy Express 1500 2500 Front Driver Power Window Motor 742-142
- Built to meet or exceed original equipment performance
- Simple electrical plug assembly, no wire splicing necessary
- High-quality steel and plastic compounds for greater durability
|
|
|
|
|
|
|
|
|
|
|
|
For 2003-2007 Chevy Express 1500 2500 Front Driver Power Window Motor 742-142
- Built to meet or exceed original equipment performance
- Simple electrical plug assembly, no wire splicing necessary
- High-quality steel and plastic compounds for greater durability
Checklist:
Use the compatibility chart to identify your vehicle.
Visually compare the part you are replacing with our pictures.
Match reference numbers from the Item specifics section above.
Find the year,make, model, engine and trim in vehicle application to ensure.
How to Replace a Car Window Motor/Window Regulator Assembly?
Part 1 of 2: Removing the window motor / regulator assembly
Step 1: Park your vehicle on a flat, hard surface. Make sure that the transmission is in park (for automatics) or in first gear (for manuals).
Step 2: Install a nine-volt battery saver into your cigarette lighter. This will keep your computer live and keep your settings current in the vehicle. If you do not have a nine-volt battery saver, you can complete the job without it; this just makes it easier.
Step 3: Open the vehicle’s hood and disconnect the battery. Take the ground cable off the battery’s negative terminal, disabling the power to the ignition system, window motor and regulator assembly.
- Note: It is important to protect your hands. Make sure to put on protective gloves prior to removing any battery terminals.
?
Step 4: Remove the window switch screws. Before removing the door panel, you need to remove the screws attaching the window switch to the door panel. If the window switch is unable to be detached, you may be able to disconnect the harness connectors under the door panel as you pull it off.
Step 5: Remove the door panel. Remove the door panel on the door with the faulty window motor and regulator. Also remove the clear plastic cover behind the door panel. You will need a razor blade to assist with removing the plastic cover.
- Note: The plastic is essential in forming a water barrier on the outside of the inner door panel because some water always gets inside the door during rainy days or at a car wash. Check that the two drain holes in the bottom of the door are clear, and that there is no buildup of debris in the bottom of the door.
?
Step 6: Remove the assembly mounting bolts. Locate the window motor and regulator inside the door. You will need to remove the four to six mounting bolts that secure the window regulator assembly to the door shell. You may have to remove the door speaker to gain access to the mounting bolts.
Step 7: Prevent the window from falling. If the window motor and regulator still works, hook up the switch to the window motor and raise the window all the way up.
If the window motor does not work, you will need to use a pry bar to push up the base assembly of the regulator to raise the window up. Use masking tape to secure the window to the door to prevent the window from falling.
Step 8: Remove the top mounting bolts. After the window is all the way up and secure, the top mounting bolts on the window regulator will be visible. Remove the window regulator bolts.
Step 9: Remove the assembly. Pull out the window motor and regulator assembly from the door. You will need to feed the wire harness attached to the window motor through the door.
Step 10: Clean the harness with electrical cleaner. Remove all moisture and debris from the connector for a strong connection.
Part 2 of 2: Installing the window motor / regulator assembly
Step 1: Install the new window motor and regulator assembly into the door. Feed the harness through the door. Install the mounting bolts to secure the window regulator to the window.
Step 2: Attach the assembly to the window. Remove the masking tape from the window. Slowly lower the window and window regulator assembly. Line up the mounting hole to the window regulator and the door shell.
Step 3: Reinstall the mounting bolts. Install the four to six mounting bolts to secure the window regulator assembly to the door shell.
- Note: If you had to remove the speaker in the door, make sure that you install the speaker and reattach any wires or harnesses to the speaker.
?
Step 4: Install the plastic covering back onto the door. If the plastic cover will not seal back onto the door, you can apply a small coat of clear silicone to the plastic. This will hold the plastic in place and keep out the moisture.
Step 5: Install the door panel back onto the door. Snap all of the door panel’s plastic tabs back into place. Replace any plastic tabs if they were broken off.
Step 6: Attach the harness to the window switch. Install the window switch back onto the door panel. Install the screws into the switch to secure it to the door panel.
- Note: If the switch could not be removed from the door panel, you will need to attach the harness to the switch as you install the door panel to the door.
?
Step 7: Reconnect the battery. Open the vehicle’s hood. Reconnect the ground cable back onto the battery’s negative terminal. Remove the nine-volt battery saver from the cigarette lighter if you used one. Tighten the battery clamp to ensure that the connection is good.
- Note: If you did not use a nine-volt battery saver, you will have to reset all of the settings in your vehicle, like your radio, electric seats, and electric mirrors.
?
Step 8: Test the new window motor. Turn the key to the accessory or run position. Operate the switch for the door window. Make sure that the window goes up and down correctly.
If your window will not go up or down after replacing the window motor and regulator assembly, then further inspection of the window motor and regulator assembly or the door wiring may be required.
| Item Specifics | |
|---|---|
| Brand | parthigh |
| Manufacturer Part Number | PH152351C07 |
| Manufacturer Warranty | 1 Year |
| Type | Regulator & Motor Assembly |
| Placement on Vehicle | Front Left Front Right Rear Left Rear Right |
| Operating Mode | Electric |
| Motor Included | Yes |
| OE/OEM Part Number | 742-142 |
| Superseded Part Number | 19153541 21096870 21170781 21171231 21171235 |
| Interchange Part Number | 10414628 10414630 10414632 15221956 16630577 |
| Package Contents | 1 Power Window Motor |
| Packaging Type | Box |
| Fit For | For 2003-2007 Chevrolet Express?1500 2500 |
| Fitment Type | Direct Replacement |
| Housing Material | Steel |
| Material | Stainless Steel |
| Gear Material | Plastic |
| Frame Material | Metal and Plastic |
| Custom Bundle | No |
| Surface Finish | Smooth |
| Product Fit | Direct fit |
| Attachment Type | Bolt On |
| Performance Part | Yes |
| Modified Item | No |
| Mounting Hardware Included | No |
| Vintage Car Part | No |
| Universal Fitment | No |
| Color | As shown |
Warning
(California Customers should pay more attention about it.)
Payment
We accept all ebay payment
Shipping
99% of orders shipped within 24 hours.
2-8 days in transit.
Nice and strong packing.
UPS, USPS, fedEx comes to be our first choice.
Return
This item is backed by our 1-year warranty.
Refund will be given as money back or replacement
Item must be returned in original pacakge and packing the same as received.
Seller is responsible for the return if delivered item not the same as described or received damaged.
Note:
Buyers are responsible for the return shipping cost if the problem ids caused by buyer.
We only warranty cost of parts, any installation or other fees are non-refundable.
About Us
If you have a question about the item you should contact us before bidding.
Any problem fund, do contact us please, any question or problem will be replied within 24 hours (except the weekend and holiday).
Our Customer Service Team is always online to answer.
Shop Category Excellent Delivery Help & Info Payment Policy Shipping Policy Return Policy FAQ About Us |
For 2003-2007 Chevy Express 1500 2500 Front Driver Power Window Motor 742-142
Checklist:
Use the compatibility chart to identify your vehicle.
Visually compare the part you are replacing with our pictures.
Match reference numbers from the Item specifics section above.
Find the year,make, model, engine and trim in vehicle application to ensure.
How to Replace a Car Window Motor/Window Regulator Assembly?
Part 1 of 2: Removing the window motor / regulator assembly
Step 1: Park your vehicle on a flat, hard surface. Make sure that the transmission is in park (for automatics) or in first gear (for manuals).
Step 2: Install a nine-volt battery saver into your cigarette lighter. This will keep your computer live and keep your settings current in the vehicle. If you do not have a nine-volt battery saver, you can complete the job without it; this just makes it easier.
Step 3: Open the vehicle’s hood and disconnect the battery. Take the ground cable off the battery’s negative terminal, disabling the power to the ignition system, window motor and regulator assembly.
? Step 4: Remove the window switch screws. Before removing the door panel, you need to remove the screws attaching the window switch to the door panel. If the window switch is unable to be detached, you may be able to disconnect the harness connectors under the door panel as you pull it off.
Step 5: Remove the door panel. Remove the door panel on the door with the faulty window motor and regulator. Also remove the clear plastic cover behind the door panel. You will need a razor blade to assist with removing the plastic cover.
? Step 6: Remove the assembly mounting bolts. Locate the window motor and regulator inside the door. You will need to remove the four to six mounting bolts that secure the window regulator assembly to the door shell. You may have to remove the door speaker to gain access to the mounting bolts.
Step 7: Prevent the window from falling. If the window motor and regulator still works, hook up the switch to the window motor and raise the window all the way up. If the window motor does not work, you will need to use a pry bar to push up the base assembly of the regulator to raise the window up. Use masking tape to secure the window to the door to prevent the window from falling.
Step 8: Remove the top mounting bolts. After the window is all the way up and secure, the top mounting bolts on the window regulator will be visible. Remove the window regulator bolts.
Step 9: Remove the assembly. Pull out the window motor and regulator assembly from the door. You will need to feed the wire harness attached to the window motor through the door.
Step 10: Clean the harness with electrical cleaner. Remove all moisture and debris from the connector for a strong connection.
Part 2 of 2: Installing the window motor / regulator assembly Step 1: Install the new window motor and regulator assembly into the door. Feed the harness through the door. Install the mounting bolts to secure the window regulator to the window.
Step 2: Attach the assembly to the window. Remove the masking tape from the window. Slowly lower the window and window regulator assembly. Line up the mounting hole to the window regulator and the door shell.
Step 3: Reinstall the mounting bolts. Install the four to six mounting bolts to secure the window regulator assembly to the door shell.
? Step 4: Install the plastic covering back onto the door. If the plastic cover will not seal back onto the door, you can apply a small coat of clear silicone to the plastic. This will hold the plastic in place and keep out the moisture.
Step 5: Install the door panel back onto the door. Snap all of the door panel’s plastic tabs back into place. Replace any plastic tabs if they were broken off.
Step 6: Attach the harness to the window switch. Install the window switch back onto the door panel. Install the screws into the switch to secure it to the door panel.
? Step 7: Reconnect the battery. Open the vehicle’s hood. Reconnect the ground cable back onto the battery’s negative terminal. Remove the nine-volt battery saver from the cigarette lighter if you used one. Tighten the battery clamp to ensure that the connection is good.
? Step 8: Test the new window motor. Turn the key to the accessory or run position. Operate the switch for the door window. Make sure that the window goes up and down correctly.
If your window will not go up or down after replacing the window motor and regulator assembly, then further inspection of the window motor and regulator assembly or the door wiring may be required.
Warning
(California Customers should pay more attention about it.) Payment
We accept all ebay payment Shipping
99% of orders shipped within 24 hours. 2-8 days in transit. Nice and strong packing. UPS, USPS, fedEx comes to be our first choice. Return
This item is backed by our 1-year warranty. Refund will be given as money back or replacement Item must be returned in original pacakge and packing the same as received. Seller is responsible for the return if delivered item not the same as described or received damaged.
Note: Buyers are responsible for the return shipping cost if the problem ids caused by buyer. We only warranty cost of parts, any installation or other fees are non-refundable. About Us
If you have a question about the item you should contact us before bidding. Any problem fund, do contact us please, any question or problem will be replied within 24 hours (except the weekend and holiday). Our Customer Service Team is always online to answer. All rights reserved. |
|||||||||||||||||||||||||||||||||||||||||||||||||||||||||||||||||||||
| Brand: | parthigh |
|---|---|
| Isin: | IWEFWOMQCSMV |
Out of Stock
In Stock
Backordered
Out of Stock


IBspot Buyer Protection
Shop confidently on IBspot, receive your item as described or your money back for eligible orders. Learn Program Terms
GUARANTEED SAFE CHECKOUT
-

MONEY BACK GUARANTEE
30 days money back guarantee, no additional fee charged.
-

EXCELLENT SUPPORT
We provide 24/7 online customer support via email.
-

Fast Shipping
One week domestic shipping. Global delivery to the US in 2 weeks.
- Built to meet or exceed original equipment performance
- Simple electrical plug assembly, no wire splicing necessary
- High-quality steel and plastic compounds for greater durability

|
|
|

|

|
|
|
|
|
|
For 2003-2007 Chevy Express 1500 2500 Front Driver Power Window Motor 742-142
- Built to meet or exceed original equipment performance
- Simple electrical plug assembly, no wire splicing necessary
- High-quality steel and plastic compounds for greater durability
Checklist:
Use the compatibility chart to identify your vehicle.
Visually compare the part you are replacing with our pictures.
Match reference numbers from the Item specifics section above.
Find the year,make, model, engine and trim in vehicle application to ensure.
How to Replace a Car Window Motor/Window Regulator Assembly?
Part 1 of 2: Removing the window motor / regulator assembly
Step 1: Park your vehicle on a flat, hard surface. Make sure that the transmission is in park (for automatics) or in first gear (for manuals).
Step 2: Install a nine-volt battery saver into your cigarette lighter. This will keep your computer live and keep your settings current in the vehicle. If you do not have a nine-volt battery saver, you can complete the job without it; this just makes it easier.
Step 3: Open the vehicle’s hood and disconnect the battery. Take the ground cable off the battery’s negative terminal, disabling the power to the ignition system, window motor and regulator assembly.
- Note: It is important to protect your hands. Make sure to put on protective gloves prior to removing any battery terminals.
?
Step 4: Remove the window switch screws. Before removing the door panel, you need to remove the screws attaching the window switch to the door panel. If the window switch is unable to be detached, you may be able to disconnect the harness connectors under the door panel as you pull it off.
Step 5: Remove the door panel. Remove the door panel on the door with the faulty window motor and regulator. Also remove the clear plastic cover behind the door panel. You will need a razor blade to assist with removing the plastic cover.
- Note: The plastic is essential in forming a water barrier on the outside of the inner door panel because some water always gets inside the door during rainy days or at a car wash. Check that the two drain holes in the bottom of the door are clear, and that there is no buildup of debris in the bottom of the door.
?
Step 6: Remove the assembly mounting bolts. Locate the window motor and regulator inside the door. You will need to remove the four to six mounting bolts that secure the window regulator assembly to the door shell. You may have to remove the door speaker to gain access to the mounting bolts.
Step 7: Prevent the window from falling. If the window motor and regulator still works, hook up the switch to the window motor and raise the window all the way up.
If the window motor does not work, you will need to use a pry bar to push up the base assembly of the regulator to raise the window up. Use masking tape to secure the window to the door to prevent the window from falling.
Step 8: Remove the top mounting bolts. After the window is all the way up and secure, the top mounting bolts on the window regulator will be visible. Remove the window regulator bolts.
Step 9: Remove the assembly. Pull out the window motor and regulator assembly from the door. You will need to feed the wire harness attached to the window motor through the door.
Step 10: Clean the harness with electrical cleaner. Remove all moisture and debris from the connector for a strong connection.
Part 2 of 2: Installing the window motor / regulator assembly
Step 1: Install the new window motor and regulator assembly into the door. Feed the harness through the door. Install the mounting bolts to secure the window regulator to the window.
Step 2: Attach the assembly to the window. Remove the masking tape from the window. Slowly lower the window and window regulator assembly. Line up the mounting hole to the window regulator and the door shell.
Step 3: Reinstall the mounting bolts. Install the four to six mounting bolts to secure the window regulator assembly to the door shell.
- Note: If you had to remove the speaker in the door, make sure that you install the speaker and reattach any wires or harnesses to the speaker.
?
Step 4: Install the plastic covering back onto the door. If the plastic cover will not seal back onto the door, you can apply a small coat of clear silicone to the plastic. This will hold the plastic in place and keep out the moisture.
Step 5: Install the door panel back onto the door. Snap all of the door panel’s plastic tabs back into place. Replace any plastic tabs if they were broken off.
Step 6: Attach the harness to the window switch. Install the window switch back onto the door panel. Install the screws into the switch to secure it to the door panel.
- Note: If the switch could not be removed from the door panel, you will need to attach the harness to the switch as you install the door panel to the door.
?
Step 7: Reconnect the battery. Open the vehicle’s hood. Reconnect the ground cable back onto the battery’s negative terminal. Remove the nine-volt battery saver from the cigarette lighter if you used one. Tighten the battery clamp to ensure that the connection is good.
- Note: If you did not use a nine-volt battery saver, you will have to reset all of the settings in your vehicle, like your radio, electric seats, and electric mirrors.
?
Step 8: Test the new window motor. Turn the key to the accessory or run position. Operate the switch for the door window. Make sure that the window goes up and down correctly.
If your window will not go up or down after replacing the window motor and regulator assembly, then further inspection of the window motor and regulator assembly or the door wiring may be required.
| Item Specifics | |
|---|---|
| Brand | parthigh |
| Manufacturer Part Number | PH152351C07 |
| Manufacturer Warranty | 1 Year |
| Type | Regulator & Motor Assembly |
| Placement on Vehicle | Front Left Front Right Rear Left Rear Right |
| Operating Mode | Electric |
| Motor Included | Yes |
| OE/OEM Part Number | 742-142 |
| Superseded Part Number | 19153541 21096870 21170781 21171231 21171235 |
| Interchange Part Number | 10414628 10414630 10414632 15221956 16630577 |
| Package Contents | 1 Power Window Motor |
| Packaging Type | Box |
| Fit For | For 2003-2007 Chevrolet Express?1500 2500 |
| Fitment Type | Direct Replacement |
| Housing Material | Steel |
| Material | Stainless Steel |
| Gear Material | Plastic |
| Frame Material | Metal and Plastic |
| Custom Bundle | No |
| Surface Finish | Smooth |
| Product Fit | Direct fit |
| Attachment Type | Bolt On |
| Performance Part | Yes |
| Modified Item | No |
| Mounting Hardware Included | No |
| Vintage Car Part | No |
| Universal Fitment | No |
| Color | As shown |
Warning
(California Customers should pay more attention about it.)
Payment
We accept all ebay payment
Shipping
99% of orders shipped within 24 hours.
2-8 days in transit.
Nice and strong packing.
UPS , USPS
 , fedEx
 comes to be our first choice.
Return
This item is backed by our 1-year warranty.
Refund will be given as money back or replacement
Item must be returned in original pacakge and packing the same as received.
Seller is responsible for the return if delivered item not the same as described or received damaged.
Note:
Buyers are responsible for the return shipping cost if the problem ids caused by buyer.
We only warranty cost of parts, any installation or other fees are non-refundable.
About Us
If you have a question about the item you should contact us before bidding.
Any problem fund, do contact us please, any question or problem will be replied within 24 hours (except the weekend and holiday).
 Our Customer Service Team is always online to answer.
Shop Category Hot Item
New List Item
Excellent Delivery
Help & Info Payment Policy Shipping Policy Return Policy FAQ About Us |
For 2003-2007 Chevy Express 1500 2500 Front Driver Power Window Motor 742-142
Checklist:
Use the compatibility chart to identify your vehicle.
Visually compare the part you are replacing with our pictures.
Match reference numbers from the Item specifics section above.
Find the year,make, model, engine and trim in vehicle application to ensure.
How to Replace a Car Window Motor/Window Regulator Assembly?
Part 1 of 2: Removing the window motor / regulator assembly
Step 1: Park your vehicle on a flat, hard surface. Make sure that the transmission is in park (for automatics) or in first gear (for manuals).
Step 2: Install a nine-volt battery saver into your cigarette lighter. This will keep your computer live and keep your settings current in the vehicle. If you do not have a nine-volt battery saver, you can complete the job without it; this just makes it easier.
Step 3: Open the vehicle’s hood and disconnect the battery. Take the ground cable off the battery’s negative terminal, disabling the power to the ignition system, window motor and regulator assembly.
? Step 4: Remove the window switch screws. Before removing the door panel, you need to remove the screws attaching the window switch to the door panel. If the window switch is unable to be detached, you may be able to disconnect the harness connectors under the door panel as you pull it off.
Step 5: Remove the door panel. Remove the door panel on the door with the faulty window motor and regulator. Also remove the clear plastic cover behind the door panel. You will need a razor blade to assist with removing the plastic cover.
? Step 6: Remove the assembly mounting bolts. Locate the window motor and regulator inside the door. You will need to remove the four to six mounting bolts that secure the window regulator assembly to the door shell. You may have to remove the door speaker to gain access to the mounting bolts.
Step 7: Prevent the window from falling. If the window motor and regulator still works, hook up the switch to the window motor and raise the window all the way up. If the window motor does not work, you will need to use a pry bar to push up the base assembly of the regulator to raise the window up. Use masking tape to secure the window to the door to prevent the window from falling.
Step 8: Remove the top mounting bolts. After the window is all the way up and secure, the top mounting bolts on the window regulator will be visible. Remove the window regulator bolts.
Step 9: Remove the assembly. Pull out the window motor and regulator assembly from the door. You will need to feed the wire harness attached to the window motor through the door.
Step 10: Clean the harness with electrical cleaner. Remove all moisture and debris from the connector for a strong connection.
Part 2 of 2: Installing the window motor / regulator assembly Step 1: Install the new window motor and regulator assembly into the door. Feed the harness through the door. Install the mounting bolts to secure the window regulator to the window.
Step 2: Attach the assembly to the window. Remove the masking tape from the window. Slowly lower the window and window regulator assembly. Line up the mounting hole to the window regulator and the door shell.
Step 3: Reinstall the mounting bolts. Install the four to six mounting bolts to secure the window regulator assembly to the door shell.
? Step 4: Install the plastic covering back onto the door. If the plastic cover will not seal back onto the door, you can apply a small coat of clear silicone to the plastic. This will hold the plastic in place and keep out the moisture.
Step 5: Install the door panel back onto the door. Snap all of the door panel’s plastic tabs back into place. Replace any plastic tabs if they were broken off.
Step 6: Attach the harness to the window switch. Install the window switch back onto the door panel. Install the screws into the switch to secure it to the door panel.
? Step 7: Reconnect the battery. Open the vehicle’s hood. Reconnect the ground cable back onto the battery’s negative terminal. Remove the nine-volt battery saver from the cigarette lighter if you used one. Tighten the battery clamp to ensure that the connection is good.
? Step 8: Test the new window motor. Turn the key to the accessory or run position. Operate the switch for the door window. Make sure that the window goes up and down correctly.
If your window will not go up or down after replacing the window motor and regulator assembly, then further inspection of the window motor and regulator assembly or the door wiring may be required.
Warning
(California Customers should pay more attention about it.) Payment
We accept all ebay payment Shipping
99% of orders shipped within 24 hours. 2-8 days in transit. Nice and strong packing. UPS Return
This item is backed by our 1-year warranty. Refund will be given as money back or replacement Item must be returned in original pacakge and packing the same as received. Seller is responsible for the return if delivered item not the same as described or received damaged.
Note: Buyers are responsible for the return shipping cost if the problem ids caused by buyer. We only warranty cost of parts, any installation or other fees are non-refundable. About Us
If you have a question about the item you should contact us before bidding. Any problem fund, do contact us please, any question or problem will be replied within 24 hours (except the weekend and holiday).
All rights reserved. |
|||||||||||||||||||||||||||||||||||||||||||||||||||||||||||||||||||||||||||||||||||||||||||||||||||||||||||||


- UPC: Does not apply
- Brand: parthigh
- Manufacturer Part Number: PH152351C07
- Manufacturer Warranty: 1 Year
- Type: Regulator & Motor Assembly
- Placement on Vehicle: Front Left Front Right Rear Left Rear Right
- Operating Mode: Electric
- Motor Included: Yes
- OE/OEM Part Number: 742-142
- Superseded Part Number: 19153541 21096870 21170781 21171231 21171235
- Interchange Part Number: 10414628 10414630 10414632 15221956 16630577
- Package Contents: 1 Power Window Motor
- Packaging Type: Box
- Fit For: For 2003-2007 Chevrolet Express?1500 2500
- Fitment Type: Direct Replacement
- Housing Material: Steel
- Material: Stainless Steel
- Gear Material: Plastic
- Frame Material: Metal and Plastic
- Custom Bundle: No
- Surface Finish: Smooth
- Product Fit: Direct fit
- Attachment Type: Bolt On
- Performance Part: Yes
- Modified Item: No
- Mounting Hardware Included: No
- Vintage Part: No
- Universal Fitment: No
- Color: As shown
Processing Time
- We process and ship orders Monday through Friday, excluding holidays.
- Most orders are processed within 1–3 business days, depending on product availability.
- Processing time does not include delivery time, which varies based on your location and the product’s shipping origin.
Shipping Coverage
We currently ship to addresses within the United States only.
Products may ship from:
- Our U.S. warehouses, or
- Our international fulfillment centers (including Korea, Japan, China, Australia, Mexico, Canada, the United Kingdom, and the EU).
Each product page clearly displays the “Ships From” location before checkout.
Shipping Methods & Estimated Delivery
| Shipping Method | Estimated Delivery | Cost |
|---|---|---|
| Free Shipping (US) | 5–10 business days | Free, available on eligible items |
| Standard Shipping (US to US by Item) | 5–10 business days | $6.50 for the first item, $3.00 each additional |
| Standard Shipping (From US Warehouse by Weight) | 3–7 business days | Starts at $6.50, increasing by $2 for every additional 4 oz (0.25 lb) up to 1 lb, then by $4 for each additional pound beyond 1 lb. |
| Extended Delivery (Ships from Overseas Warehouse) | 10–15 business days | $14.50 for the first item, $4.00 each additional |
Shipping costs vary by product weight, quantity and origin. Exact rates and delivery estimates are displayed on each product page and confirmed during checkout.
Free Shipping
We offer free standard shipping on select products or during promotional periods. Availability of free shipping will be displayed on the product page and at checkout.
Carriers
We primarily use USPS and UPS for U.S. deliveries. Items shipped from international warehouses may be handled by partner carriers depending on the country of origin.
Import Duties & Taxes
All import duties and taxes for goods imported into the United States are included in the product price. There are no hidden fees or additional charges at checkout.
Tracking & Notifications
Every order is fully trackable. You will receive a tracking number via email once your order ships. If your order ships in multiple packages, each package will have its own tracking number. If you don’t receive a shipping confirmation immediately, your order is still being processed and will arrive within the estimated timeframe shown at checkout.
You can track your shipment anytime using the Track Your Order page on our website.
Order Changes & Cancellations
If you need to modify or cancel an order, please contact our customer support team as soon as possible. Orders can only be canceled before they ship. Once shipped, cancellations are not possible, but you may request a return after the item is delivered.
Contact: support@ibspot.com
Item Not Received
If your tracking number shows “Delivered” but you haven’t received your package:
- Check with your local USPS or UPS office.
- Confirm that the shipping address provided was correct.
- If the issue remains unresolved, contact support@ibspot.com for assistance.
Damaged or Lost Parcels
If your package arrives damaged or fails to arrive, please contact us immediately. For deliveries to P.O. boxes, ibspot is not responsible for damage caused by weather, temperature, or theft.
Customer Support
For any questions about shipping, tracking, or delivery, our customer support team is here to help.
Email: support@ibspot.com
We’re always happy to help.
Please read our policy carefully before making a purchase.
We aim to ensure every customer has a smooth and transparent experience with ibspot.com.
Order Cancellation Policy
Customers may request to cancel an order before it has been shipped.
Once the package has been shipped, cancellations are no longer possible; however, you may still request a return after receiving your order.
How to Request a Cancellation
You can contact us through:
-
Email: support@ibspot.com
-
Contact Form: Submit a request through our Contact Us page
Please submit your cancellation request as soon as possible after placing the order to allow us to process it before shipment.
Return Policy
We accept returns for most items within 30 days of delivery for a full refund.
To be eligible for a return:
-
The item must be unused, in the same condition as received, and in its original packaging.
-
A tracking number must be provided to confirm the return shipment.
Non-Returnable Items
Certain products cannot be returned, including:
-
Perishable goods (for example, food, flowers, newspapers, magazines)
-
Intimate or sanitary goods
-
Hazardous materials or flammable liquids/gases
-
Gift cards
-
Downloadable software
-
Some health and personal care items
Partial Refunds (If Applicable)
Partial refunds may be granted in specific situations, such as:
-
Books with obvious signs of use
-
Opened CDs, DVDs, software, or vinyl records
-
Items not in their original condition, damaged, or missing parts not due to our error
-
Items returned more than 30 days after delivery
How to Return an Item
To initiate a return, please contact us at support@ibspot.com with your order number and details about the product you wish to return.
Our team will provide you with return instructions and a prepaid return label.
Shipping Cost for Returns
Please contact us before returning any item.
We will provide a free return shipping label.
If a return is sent back without prior contact or without our provided label, we cannot be held responsible for return shipping costs.
For items valued over $75, we recommend using a trackable shipping service or purchasing shipping insurance.
We cannot guarantee that we will receive your returned item if shipped independently.
Refund Processing
Once your return is received and inspected:
-
In-store returns are refunded to the original form of payment or issued as a gift card.
-
Mail-in returns using our prepaid label are refunded to the original payment method within 3–5 business days after we receive your return.
Please allow:
-
5–7 business days for the return to reach our Returns Center.
-
An additional 3–10 business days for your bank to post the refund to your account.
Damages, Issues & Claims
Please inspect your order immediately upon receipt.
If you receive a defective, damaged, or incorrect item, contact us right away at support@ibspot.com.
We’ll evaluate the issue promptly and make it right.
Product Claims
Before purchasing, please review product details carefully.
If there is a problem with your order upon arrival, visit our Support Center or contact us directly to arrange return shipping or replacement.
Exchanges
We do not process direct exchanges.
The fastest way to get what you need is to return the original item and place a new order once your return is accepted.
Return Address
IBSPOT Return Center
15 Sawmill Ln
Dover Plains, NY 12522
United States
Customer Support
Our support team is available 24/7 to assist with cancellations, returns, or general inquiries.
Email: support@ibspot.com
Contact Form: Contact Us page
Oops!
Sorry, it looks like some products are not available in selected quantity.