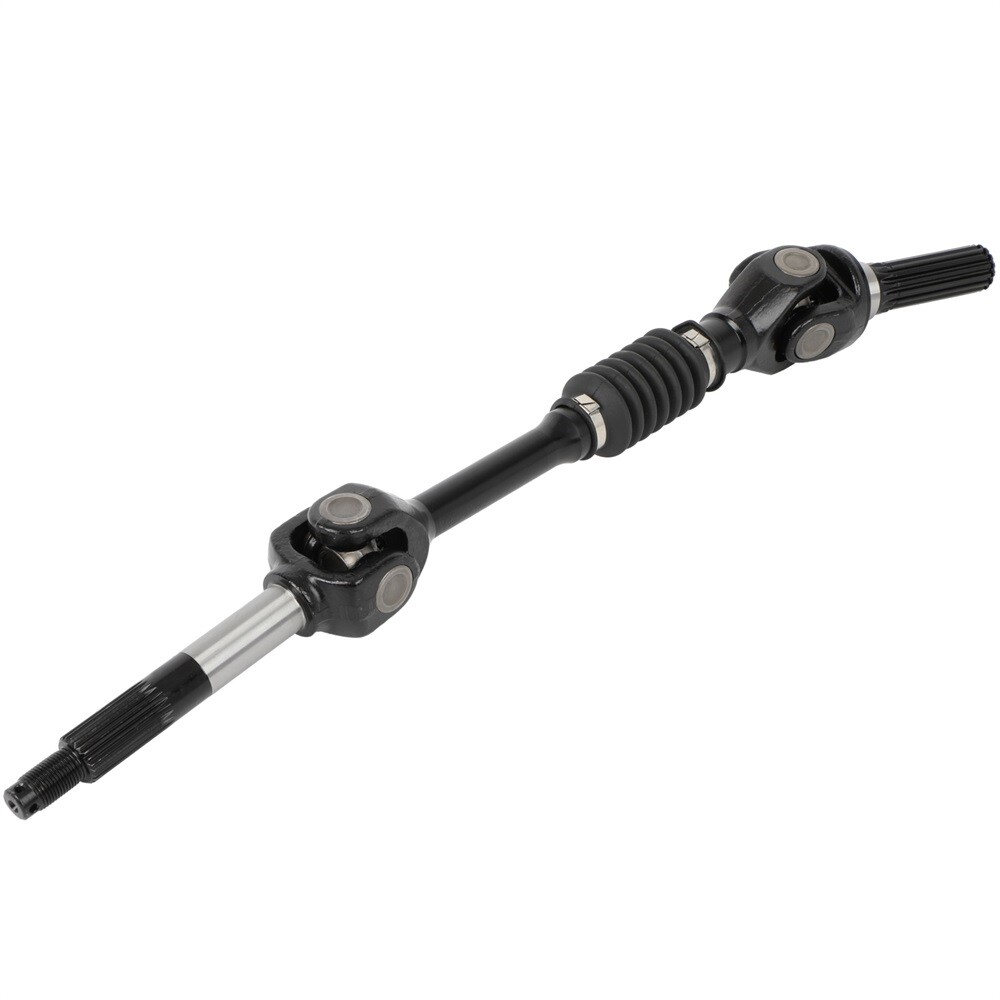
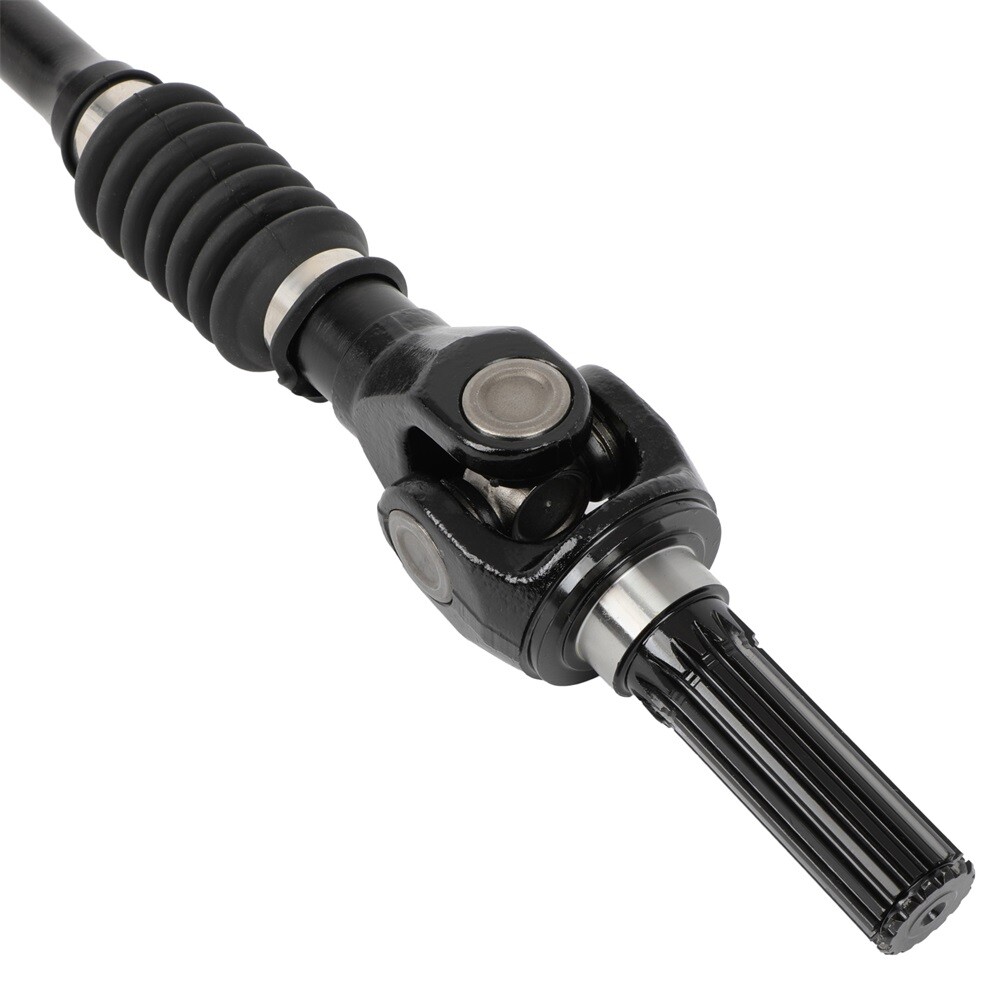
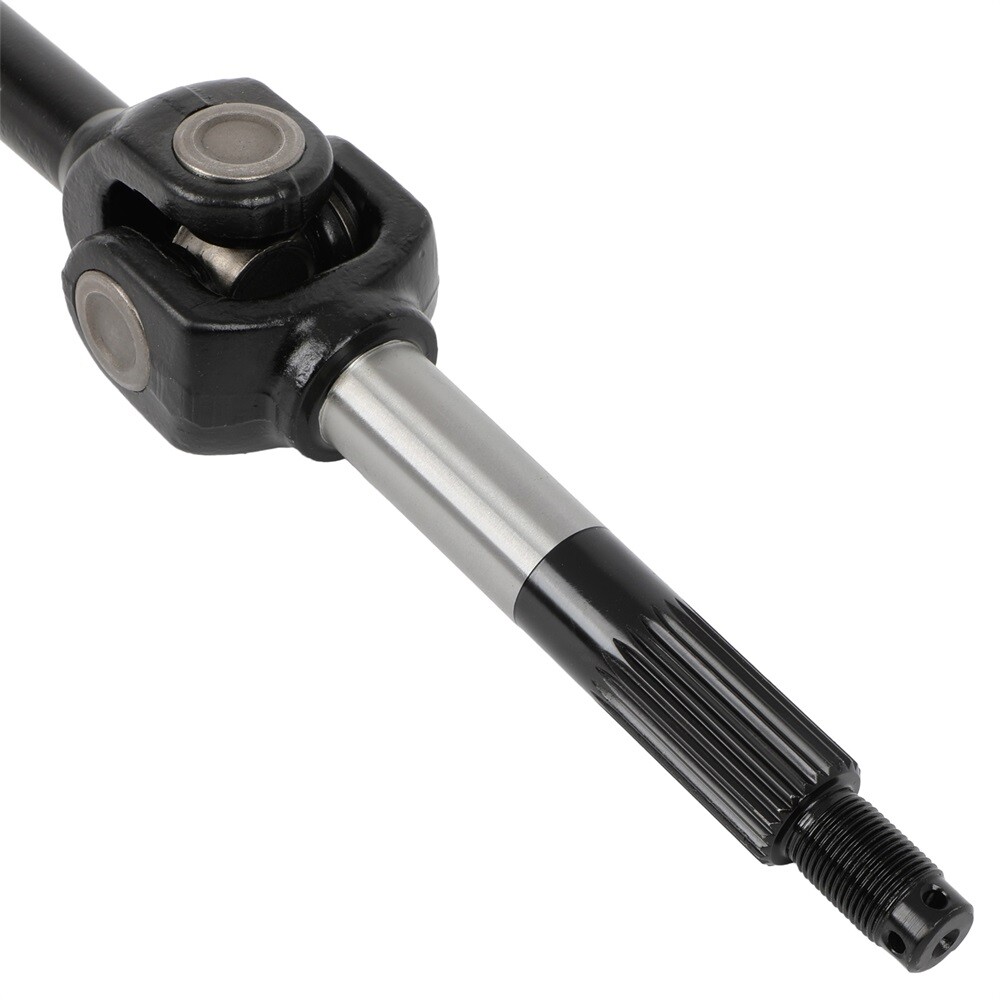
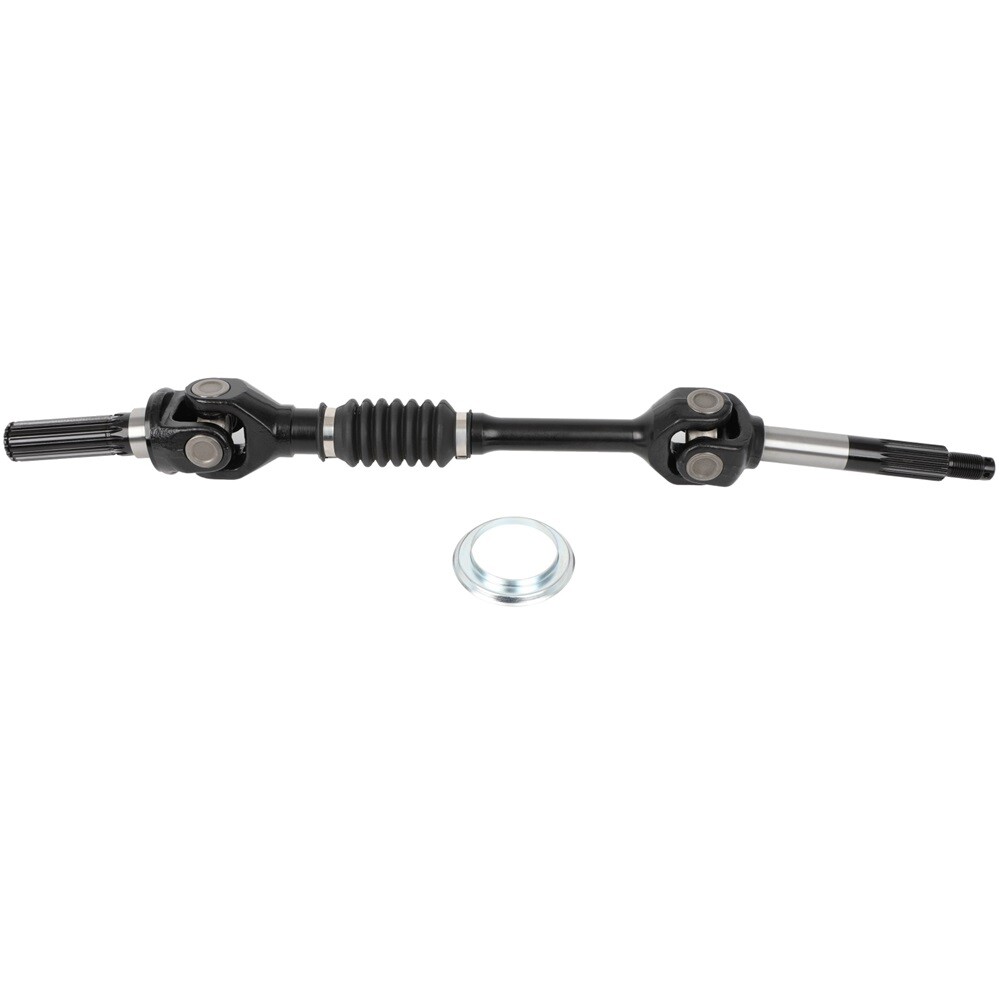
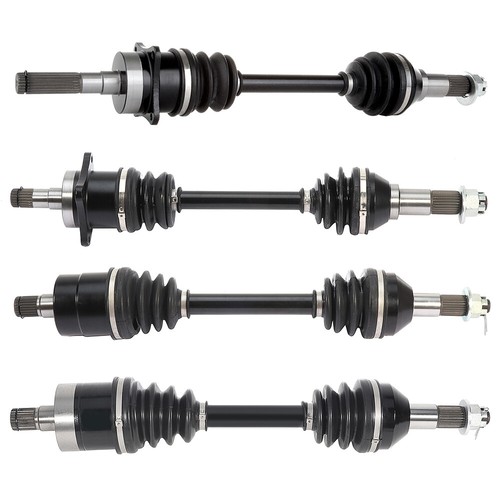
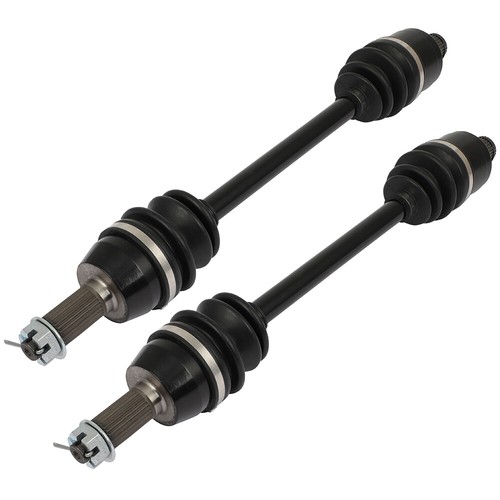
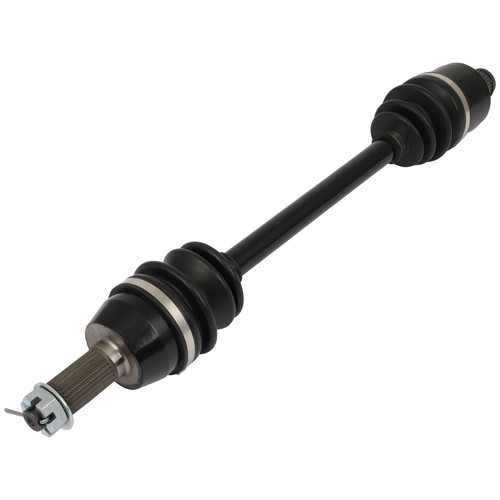
ORRIGEY New Rear CV Axle for Kawasaki Mule 3000 3010 4000 4010 4x4 Complete UTV
ORRIGEY New Rear CV Axle for Kawasaki Mule 3000 3010 4000 4010 4x4 Complete UTV


ORRIGEY New Rear CV Axle for Kawasaki Mule 3000 3010 4000 4010 4x4 Complete UTV
- Excessive vibrations during operation
- Loud clicking during turns
- Grease leaking from the CV joint onto the tire
|
|
|
||||||
|
|
|
|
|
|||
New Rear CV Axle for Kawasaki Mule 3000 3010 4000 4010 4x4 Complete UTV
How to Replace a CV Axle ?
The procedure for replacing a CV axle will vary, depending on the year, make, and model of the vehicle.
1. Here are a few signs that your axle shaft needs to be replaced:
- Excessive vibrations during operation
- Loud clicking during turns
- Grease leaking from the CV joint onto the tire
2. What You'll Need
- Breaker bar
- Dead-blow hammer
- Drain pan
- Jack and jack stands
- Large hammer or mallet
- Long-handled diagonal cutting pliers
- Pry bar or CV axle puller
- Ratchet and socket set
- Repair manual or access to a repair database
- Safety glasses
- Screwdrivers
- Torque wrench
- Wheel chocks
- Wrench set
3. Replacing The CV Axle
Note: The following are general guidelines for educational purposes only. Consult your vehicle’s factory information for specific repair instructions and recommended safety procedures.
Step1.Make sure the vehicle is in Park or that it is in gear with the parking brake set.
Step2.Jack up the car and remove the wheel on the side where you will be working.
Step3.Locate the axle nut. It will be in the direct center of the hub or wheel assembly where you removed the wheel.
Step4.Some vehicles have a cotter pin to secure the axle nut. You’ll need to remove it using pliers to straighten the pin so it can be pulled out. You can spray it with lubricant if it’s rusted or stuck.
Step5. Remove the axle nut. In some cases, this step may require quite a bit of effort. If this is the case, your safety bet is to do this step before jacking the car up.
- This is where the optional impact wrench will come in handy. The wrench will help you safely remove the axle nut without having to use a pry bar.
Step6.Carefully remove the bolts holding the brake caliper brackets in place and remove the calipers.
- Instead of dropping the caliper to dangle on the brake line, use a carabiner or other small hook to support the caliper and keep pressure off the brake line.
Step7.Loosed the bolts holding the outer tie rod to the steering knuckle. If there’s another pin here, you’ll again need to use pliers to straighten it out.
- In some cases, the steering knuckle and tie rod will not want to be separated. This will require a few light taps with a hammer or mallet.
Step8.Remove the bolts holding the hub to the strut tower. You’ll need to keep the nut from turning while unbolting the hub.
Step9.Look further down the axle to see where it meets the transmission. Use your pry bar to pry the axle from the CV joint. You should be able to remove the axle at this point.
- You might see transmission fluid or have some leak while prying the axle. This is completely fine, but you may want to set up a pan or tray to catch the fluid.
Step10.Insert the new axle into the transmission where the old one was removed.
- You can use your mallet or a hammer wrapped in a towel to carefully coax the axle into position.
Step11.Attach the new axle to the hub and begin replacing the bolts you removed earlier in the process:
- Hub/strut tower
- Tie Rod/steering knuckle
- Caliper
Step12.Replace the axle nut. Here, as before, use an impact wrench if you have one to safely tighten the nut. If you don’t have one, get the nut as tight as you can without yanking on it while it’s up on stands.
Step13.Replace the wheel and lower the vehicle.
- If you need to tighten the axle nut further, it’s best to do it with the vehicle on the ground, so that you can really push on a wrench or bar to tighten without worrying about the vehicle falling.
FAQs About CV Axles
Q: Can You Drive With a Bad CV Axle?
A: No. Do not ignore a bad CV axle. The vibrations you’re feeling and noise you’re hearing are a warning that it’s time for maintenance. If your axle fails while you’re driving, you could lose control of your car.
Q: How Long Should a CV Axle Last?
A: CV axles are usually covered by the manufacturer’s powertrain warranty, which should have you covered for at least four to five years and 50,000 to 60,000 miles. As for whether or not the axle makes it past the warranty period, there are many factors that can impact its lifespan. Driving over rough terrain where there are rocks and debris can shorten the life of a CV axle, because there are more opportunities to damage the rubber boot that protects the moving parts. The same goes for driving in snowy or icy conditions, where salt and sand can also damage the rubber. In some cases, the rubber just dries out and cracks, which has the same effect.
Q: What Does a Bad Axle Sound Like?
A: If you hear a clicking or grinding sound while turning, there’s a good chance your CV axle is starting to go. The noise may also be present while accelerating, but it’s most noticeable when turning the steering wheel.
Q: Can The CV Axle Damage My Transmission?
A: Yes, since it’s connected directly to the transmission, a failing CV axle can cause damage. Excessive movement from a damaged axle can wear components inside the transmission more quickly than they would normally.
| Item Specifics | |
|---|---|
| Manufacturer Part Number | ORR133155Y01 |
| Brand | ORRIGEY |
| Placement on Vehicle | Rear Left Right |
| Quantity | 1 |
| Compatible Year | 1998-2004 |
| Compatible Make | Honda |
| Compatible Model | Foreman 450 |
| Colour | Normal black |
| Weight | 8 LB |
| Bundle Listing | No |
| Warranty | 1 Year |
| Material | Metal |
| Fits | ATV |
| OE Spec or Performance/Custom | Performance/Custom |
| Note | Verify this part fits your vehicle using the compatibility chart |
| Condition | New |
| Shipped country | US |
| Package Type | Box |
| Modified Item | NO |
| Fitment Type | Direct Replacement |
PAYMENT
1.We accept multiple payment methods
2. Payment must be made within 4 days of auction closing.
3. Total amount due includes the final auction price plus S&H (Shipping and Handling).
4. S&H will be determined based upon the ship to address.
PLEASE NOTE: S&H does not include duties, local taxes
SHIPPING
Standard Order Processing time:
All items will ship within 24 hours (Monday - Friday).
Payment cleared/received on Friday will be shipped on the next business days (Monday or Tuesday)
We are not responsible for carrier transit time. This information is provided by the carrier and excludes weekends and holidays. Note that transit times may vary, particularly during peak periods or in climate weather conditions, and that delivery times frames will need to be extended for any processing time frames in excess of 1-2 business days.
International Shipping:
International buyers are responsible for possible customs fees, brokerage fees or duty fees. We would appreciate for understanding of tracking number would not be updated in between the city of departing in the U.S. and the city of destination.
RETURN
Please notify us within 30 days after you've received your purchased item.
All return requests must be submitted through your eBay account.
If your order has been received and it is not what you ordered, or if your item has a manufacturer defect, please contact us as soon as possible,and then we will give you a resolution as soon as possible.
Items to be returned must be in resalable condition,30 Days money back, please notify us within 30 days after you've received your purchased item.
FEEDBACK
We maintain high standards of excellence (five stars review)and strive for 100% customer satisfaction! FEEDBACK IS VERY IMPORTANT TO US. We request that you contact us immediately BEFORE you give us neutral or negative feedback, so that we can satisfactorily address your concerns.
It is impossible to address issues if we do not know about them!
If you have any question,please don't be hesitated to contact us .We always strive for 100% customer satisfaction. With your support, we will make a progress everyday, we always grow up with you.
WARRANTY
1. 12 months Manufacturer's Warranty for defective items (excluding items damaged and/or misused after receipt). Accessories come with a 3-month warranty.
2. Defective items must be reported and returned to us within the warranty period (and in the original packaging, if possible). You must tell us what the defect is and give us your eBay ID. we do not repair or replace items with an expired warranty.
You agree to all of the above-listed policies upon bidding on and winning this auction!
New Rear CV Axle for Kawasaki Mule 3000 3010 4000 4010 4x4 Complete UTV
How to Replace a CV Axle ?
The procedure for replacing a CV axle will vary, depending on the year, make, and model of the vehicle.
1. Here are a few signs that your axle shaft needs to be replaced:
2. What You'll Need
3. Replacing The CV Axle
Note: The following are general guidelines for educational purposes only. Consult your vehicle’s factory information for specific repair instructions and recommended safety procedures.
Step1.Make sure the vehicle is in Park or that it is in gear with the parking brake set.
Step2.Jack up the car and remove the wheel on the side where you will be working.
Step3.Locate the axle nut. It will be in the direct center of the hub or wheel assembly where you removed the wheel.
Step4.Some vehicles have a cotter pin to secure the axle nut. You’ll need to remove it using pliers to straighten the pin so it can be pulled out. You can spray it with lubricant if it’s rusted or stuck.
Step5. Remove the axle nut. In some cases, this step may require quite a bit of effort. If this is the case, your safety bet is to do this step before jacking the car up.
Step6.Carefully remove the bolts holding the brake caliper brackets in place and remove the calipers.
Step7.Loosed the bolts holding the outer tie rod to the steering knuckle. If there’s another pin here, you’ll again need to use pliers to straighten it out.
Step8.Remove the bolts holding the hub to the strut tower. You’ll need to keep the nut from turning while unbolting the hub.
Step9.Look further down the axle to see where it meets the transmission. Use your pry bar to pry the axle from the CV joint. You should be able to remove the axle at this point.
Step10.Insert the new axle into the transmission where the old one was removed.
Step11.Attach the new axle to the hub and begin replacing the bolts you removed earlier in the process:
Step12.Replace the axle nut. Here, as before, use an impact wrench if you have one to safely tighten the nut. If you don’t have one, get the nut as tight as you can without yanking on it while it’s up on stands.
Step13.Replace the wheel and lower the vehicle.
FAQs About CV Axles Q: Can You Drive With a Bad CV Axle? A: No. Do not ignore a bad CV axle. The vibrations you’re feeling and noise you’re hearing are a warning that it’s time for maintenance. If your axle fails while you’re driving, you could lose control of your car.
Q: How Long Should a CV Axle Last? A: CV axles are usually covered by the manufacturer’s powertrain warranty, which should have you covered for at least four to five years and 50,000 to 60,000 miles. As for whether or not the axle makes it past the warranty period, there are many factors that can impact its lifespan. Driving over rough terrain where there are rocks and debris can shorten the life of a CV axle, because there are more opportunities to damage the rubber boot that protects the moving parts. The same goes for driving in snowy or icy conditions, where salt and sand can also damage the rubber. In some cases, the rubber just dries out and cracks, which has the same effect.
Q: What Does a Bad Axle Sound Like? A: If you hear a clicking or grinding sound while turning, there’s a good chance your CV axle is starting to go. The noise may also be present while accelerating, but it’s most noticeable when turning the steering wheel.
Q: Can The CV Axle Damage My Transmission? A: Yes, since it’s connected directly to the transmission, a failing CV axle can cause damage. Excessive movement from a damaged axle can wear components inside the transmission more quickly than they would normally. 1.We accept multiple payment methods Standard Order Processing time: International Shipping: Please notify us within 30 days after you've received your purchased item. If your order has been received and it is not what you ordered, or if your item has a manufacturer defect, please contact us as soon as possible,and then we will give you a resolution as soon as possible. Items to be returned must be in resalable condition,30 Days money back, please notify us within 30 days after you've received your purchased item. We maintain high standards of excellence (five stars review)and strive for 100% customer satisfaction! FEEDBACK IS VERY IMPORTANT TO US. We request that you contact us immediately BEFORE you give us neutral or negative feedback, so that we can satisfactorily address your concerns. It is impossible to address issues if we do not know about them! If you have any question,please don't be hesitated to contact us .We always strive for 100% customer satisfaction. With your support, we will make a progress everyday, we always grow up with you. 1. 12 months Manufacturer's Warranty for defective items (excluding items damaged and/or misused after receipt). Accessories come with a 3-month warranty. Copyright of ORRIGEYPARTS_All rights reserved. |
Shop Category Picture |
| Brand: | ORRIGEY |
|---|---|
| Isin: | IWXX6MXJNFOK |
Out of Stock
In Stock
Backordered
Out of Stock


IBspot Buyer Protection
Shop confidently on IBspot, receive your item as described or your money back for eligible orders. Learn Program Terms
GUARANTEED SAFE CHECKOUT
-

MONEY BACK GUARANTEE
30 days money back guarantee, no additional fee charged.
-

EXCELLENT SUPPORT
We provide 24/7 online customer support via email.
-

Fast Shipping
One week domestic shipping. Global delivery to the US in 2 weeks.
- Excessive vibrations during operation
- Loud clicking during turns
- Grease leaking from the CV joint onto the tire


|
|
||||||

|
|
|
|
|||

New Rear CV Axle for Kawasaki Mule 3000 3010 4000 4010 4x4 Complete UTV
How to Replace a CV Axle ?
The procedure for replacing a CV axle will vary, depending on the year, make, and model of the vehicle.
1. Here are a few signs that your axle shaft needs to be replaced:
- Excessive vibrations during operation
- Loud clicking during turns
- Grease leaking from the CV joint onto the tire
2. What You'll Need
- Breaker bar
- Dead-blow hammer
- Drain pan
- Jack and jack stands
- Large hammer or mallet
- Long-handled diagonal cutting pliers
- Pry bar or CV axle puller
- Ratchet and socket set
- Repair manual or access to a repair database
- Safety glasses
- Screwdrivers
- Torque wrench
- Wheel chocks
- Wrench set
3. Replacing The CV Axle
Note: The following are general guidelines for educational purposes only. Consult your vehicle’s factory information for specific repair instructions and recommended safety procedures.
Step1.Make sure the vehicle is in Park or that it is in gear with the parking brake set.
Step2.Jack up the car and remove the wheel on the side where you will be working.
Step3.Locate the axle nut. It will be in the direct center of the hub or wheel assembly where you removed the wheel.
Step4.Some vehicles have a cotter pin to secure the axle nut. You’ll need to remove it using pliers to straighten the pin so it can be pulled out. You can spray it with lubricant if it’s rusted or stuck.
Step5. Remove the axle nut. In some cases, this step may require quite a bit of effort. If this is the case, your safety bet is to do this step before jacking the car up.
- This is where the optional impact wrench will come in handy. The wrench will help you safely remove the axle nut without having to use a pry bar.
Step6.Carefully remove the bolts holding the brake caliper brackets in place and remove the calipers.
- Instead of dropping the caliper to dangle on the brake line, use a carabiner or other small hook to support the caliper and keep pressure off the brake line.
Step7.Loosed the bolts holding the outer tie rod to the steering knuckle. If there’s another pin here, you’ll again need to use pliers to straighten it out.
- In some cases, the steering knuckle and tie rod will not want to be separated. This will require a few light taps with a hammer or mallet.
Step8.Remove the bolts holding the hub to the strut tower. You’ll need to keep the nut from turning while unbolting the hub.
Step9.Look further down the axle to see where it meets the transmission. Use your pry bar to pry the axle from the CV joint. You should be able to remove the axle at this point.
- You might see transmission fluid or have some leak while prying the axle. This is completely fine, but you may want to set up a pan or tray to catch the fluid.
Step10.Insert the new axle into the transmission where the old one was removed.
- You can use your mallet or a hammer wrapped in a towel to carefully coax the axle into position.
Step11.Attach the new axle to the hub and begin replacing the bolts you removed earlier in the process:
- Hub/strut tower
- Tie Rod/steering knuckle
- Caliper
Step12.Replace the axle nut. Here, as before, use an impact wrench if you have one to safely tighten the nut. If you don’t have one, get the nut as tight as you can without yanking on it while it’s up on stands.
Step13.Replace the wheel and lower the vehicle.
- If you need to tighten the axle nut further, it’s best to do it with the vehicle on the ground, so that you can really push on a wrench or bar to tighten without worrying about the vehicle falling.
FAQs About CV Axles
Q: Can You Drive With a Bad CV Axle?
A: No. Do not ignore a bad CV axle. The vibrations you’re feeling and noise you’re hearing are a warning that it’s time for maintenance. If your axle fails while you’re driving, you could lose control of your car.
Q: How Long Should a CV Axle Last?
A: CV axles are usually covered by the manufacturer’s powertrain warranty, which should have you covered for at least four to five years and 50,000 to 60,000 miles. As for whether or not the axle makes it past the warranty period, there are many factors that can impact its lifespan. Driving over rough terrain where there are rocks and debris can shorten the life of a CV axle, because there are more opportunities to damage the rubber boot that protects the moving parts. The same goes for driving in snowy or icy conditions, where salt and sand can also damage the rubber. In some cases, the rubber just dries out and cracks, which has the same effect.
Q: What Does a Bad Axle Sound Like?
A: If you hear a clicking or grinding sound while turning, there’s a good chance your CV axle is starting to go. The noise may also be present while accelerating, but it’s most noticeable when turning the steering wheel.
Q: Can The CV Axle Damage My Transmission?
A: Yes, since it’s connected directly to the transmission, a failing CV axle can cause damage. Excessive movement from a damaged axle can wear components inside the transmission more quickly than they would normally.
| Item Specifics | |
|---|---|
| Manufacturer Part Number | ORR133155Y01 |
| Brand | ORRIGEY |
| Placement on Vehicle | Rear Left Right |
| Quantity | 1 |
| Compatible Year | 1998-2004 |
| Compatible Make | Honda |
| Compatible Model | Foreman 450 |
| Colour | Normal black |
| Weight | 8 LB |
| Bundle Listing | No |
| Warranty | 1 Year |
| Material | Metal |
| Fits | ATV |
| OE Spec or Performance/Custom | Performance/Custom |
| Note | Verify this part fits your vehicle using the compatibility chart |
| Condition | New |
| Shipped country | US |
| Package Type | Box |
| Modified Item | NO |
| Fitment Type | Direct Replacement |
PAYMENT
1.We accept multiple payment methods
2. Payment must be made within 4 days of auction closing.
3. Total amount due includes the final auction price plus S&H (Shipping and Handling).
4. S&H will be determined based upon the ship to address.
PLEASE NOTE: S&H does not include duties, local taxes
SHIPPING
Standard Order Processing time:
All items will ship within 24 hours (Monday - Friday).
Payment cleared/received on Friday will be shipped on the next business days (Monday or Tuesday)
We are not responsible for carrier transit time. This information is provided by the carrier and excludes weekends and holidays. Note that transit times may vary, particularly during peak periods or in climate weather conditions, and that delivery times frames will need to be extended for any processing time frames in excess of 1-2 business days.
International Shipping:
International buyers are responsible for possible customs fees, brokerage fees or duty fees. We would appreciate for understanding of tracking number would not be updated in between the city of departing in the U.S. and the city of destination.
RETURN
Please notify us within 30 days after you've received your purchased item.
All return requests must be submitted through your eBay account.
If your order has been received and it is not what you ordered, or if your item has a manufacturer defect, please contact us as soon as possible,and then we will give you a resolution as soon as possible.
Items to be returned must be in resalable condition,30 Days money back, please notify us within 30 days after you've received your purchased item.
FEEDBACK
We maintain high standards of excellence (five stars review)and strive for 100% customer satisfaction! FEEDBACK IS VERY IMPORTANT TO US. We request that you contact us immediately BEFORE you give us neutral or negative feedback, so that we can satisfactorily address your concerns.
It is impossible to address issues if we do not know about them!
If you have any question,please don't be hesitated to contact us .We always strive for 100% customer satisfaction. With your support, we will make a progress everyday, we always grow up with you.
WARRANTY
1. 12 months Manufacturer's Warranty for defective items (excluding items damaged and/or misused after receipt). Accessories come with a 3-month warranty.
2. Defective items must be reported and returned to us within the warranty period (and in the original packaging, if possible). You must tell us what the defect is and give us your eBay ID. we do not repair or replace items with an expired warranty.
You agree to all of the above-listed policies upon bidding on and winning this auction!
DESCRIPTION PAYMENT SHIPPING RETURN POLICY CONTACT US |
New Rear CV Axle for Kawasaki Mule 3000 3010 4000 4010 4x4 Complete UTV
How to Replace a CV Axle ?
The procedure for replacing a CV axle will vary, depending on the year, make, and model of the vehicle.
1. Here are a few signs that your axle shaft needs to be replaced:
2. What You'll Need
3. Replacing The CV Axle
Note: The following are general guidelines for educational purposes only. Consult your vehicle’s factory information for specific repair instructions and recommended safety procedures.
Step1.Make sure the vehicle is in Park or that it is in gear with the parking brake set.
Step2.Jack up the car and remove the wheel on the side where you will be working.
Step3.Locate the axle nut. It will be in the direct center of the hub or wheel assembly where you removed the wheel.
Step4.Some vehicles have a cotter pin to secure the axle nut. You’ll need to remove it using pliers to straighten the pin so it can be pulled out. You can spray it with lubricant if it’s rusted or stuck.
Step5. Remove the axle nut. In some cases, this step may require quite a bit of effort. If this is the case, your safety bet is to do this step before jacking the car up.
Step6.Carefully remove the bolts holding the brake caliper brackets in place and remove the calipers.
Step7.Loosed the bolts holding the outer tie rod to the steering knuckle. If there’s another pin here, you’ll again need to use pliers to straighten it out.
Step8.Remove the bolts holding the hub to the strut tower. You’ll need to keep the nut from turning while unbolting the hub.
Step9.Look further down the axle to see where it meets the transmission. Use your pry bar to pry the axle from the CV joint. You should be able to remove the axle at this point.
Step10.Insert the new axle into the transmission where the old one was removed.
Step11.Attach the new axle to the hub and begin replacing the bolts you removed earlier in the process:
Step12.Replace the axle nut. Here, as before, use an impact wrench if you have one to safely tighten the nut. If you don’t have one, get the nut as tight as you can without yanking on it while it’s up on stands.
Step13.Replace the wheel and lower the vehicle.
FAQs About CV Axles Q: Can You Drive With a Bad CV Axle? A: No. Do not ignore a bad CV axle. The vibrations you’re feeling and noise you’re hearing are a warning that it’s time for maintenance. If your axle fails while you’re driving, you could lose control of your car.
Q: How Long Should a CV Axle Last? A: CV axles are usually covered by the manufacturer’s powertrain warranty, which should have you covered for at least four to five years and 50,000 to 60,000 miles. As for whether or not the axle makes it past the warranty period, there are many factors that can impact its lifespan. Driving over rough terrain where there are rocks and debris can shorten the life of a CV axle, because there are more opportunities to damage the rubber boot that protects the moving parts. The same goes for driving in snowy or icy conditions, where salt and sand can also damage the rubber. In some cases, the rubber just dries out and cracks, which has the same effect.
Q: What Does a Bad Axle Sound Like? A: If you hear a clicking or grinding sound while turning, there’s a good chance your CV axle is starting to go. The noise may also be present while accelerating, but it’s most noticeable when turning the steering wheel.
Q: Can The CV Axle Damage My Transmission? A: Yes, since it’s connected directly to the transmission, a failing CV axle can cause damage. Excessive movement from a damaged axle can wear components inside the transmission more quickly than they would normally. 1.We accept multiple payment methods Standard Order Processing time: International Shipping: Please notify us within 30 days after you've received your purchased item. If your order has been received and it is not what you ordered, or if your item has a manufacturer defect, please contact us as soon as possible,and then we will give you a resolution as soon as possible. Items to be returned must be in resalable condition,30 Days money back, please notify us within 30 days after you've received your purchased item. We maintain high standards of excellence (five stars review)and strive for 100% customer satisfaction! FEEDBACK IS VERY IMPORTANT TO US. We request that you contact us immediately BEFORE you give us neutral or negative feedback, so that we can satisfactorily address your concerns. It is impossible to address issues if we do not know about them! If you have any question,please don't be hesitated to contact us .We always strive for 100% customer satisfaction. With your support, we will make a progress everyday, we always grow up with you. 1. 12 months Manufacturer's Warranty for defective items (excluding items damaged and/or misused after receipt). Accessories come with a 3-month warranty. Copyright of ORRIGEYPARTS_All rights reserved. |
Shop Category Hot Item
Picture
New List Item
|


- Manufacturer Part Number: ORR133155Y01
- Brand: ORRIGEY
- UPC: Does not apply
- Placement on Vehicle: Rear Left Right
- Quantity: 1
- Compatible Year: 1998-2004
- Compatible Make: Honda
- Compatible Model: Foreman 450
- Colour: Normal black
- Bundle Listing: No
- Warranty: 1 Year
- Material: Metal
- Fits: ATV
- OE Spec or Performance/Custom: Performance/Custom
- Note: Verify this part fits your vehicle using the compatibility chart
- Shipped country: US
- Package Type: Box
- Modified Item: NO
- Fitment Type: Direct Replacement
Processing Time
- We process and ship orders Monday through Friday, excluding holidays.
- Most orders are processed within 1–3 business days, depending on product availability.
- Processing time does not include delivery time, which varies based on your location and the product’s shipping origin.
Shipping Coverage
We currently ship to addresses within the United States only.
Products may ship from:
- Our U.S. warehouses, or
- Our international fulfillment centers (including Korea, Japan, China, Australia, Mexico, Canada, the United Kingdom, and the EU).
Each product page clearly displays the “Ships From” location before checkout.
Shipping Methods & Estimated Delivery
| Shipping Method | Estimated Delivery | Cost |
|---|---|---|
| Free Shipping (US) | 5–10 business days | Free, available on eligible items |
| Standard Shipping (US to US by Item) | 5–10 business days | $6.50 for the first item, $3.00 each additional |
| Standard Shipping (From US Warehouse by Weight) | 3–7 business days | Starts at $6.50, increasing by $2 for every additional 4 oz (0.25 lb) up to 1 lb, then by $4 for each additional pound beyond 1 lb. |
| Extended Delivery (Ships from Overseas Warehouse) | 10–15 business days | $14.50 for the first item, $4.00 each additional |
Shipping costs vary by product weight, quantity and origin. Exact rates and delivery estimates are displayed on each product page and confirmed during checkout.
Free Shipping
We offer free standard shipping on select products or during promotional periods. Availability of free shipping will be displayed on the product page and at checkout.
Carriers
We primarily use USPS and UPS for U.S. deliveries. Items shipped from international warehouses may be handled by partner carriers depending on the country of origin.
Import Duties & Taxes
All import duties and taxes for goods imported into the United States are included in the product price. There are no hidden fees or additional charges at checkout.
Tracking & Notifications
Every order is fully trackable. You will receive a tracking number via email once your order ships. If your order ships in multiple packages, each package will have its own tracking number. If you don’t receive a shipping confirmation immediately, your order is still being processed and will arrive within the estimated timeframe shown at checkout.
You can track your shipment anytime using the Track Your Order page on our website.
Order Changes & Cancellations
If you need to modify or cancel an order, please contact our customer support team as soon as possible. Orders can only be canceled before they ship. Once shipped, cancellations are not possible, but you may request a return after the item is delivered.
Contact: support@ibspot.com
Item Not Received
If your tracking number shows “Delivered” but you haven’t received your package:
- Check with your local USPS or UPS office.
- Confirm that the shipping address provided was correct.
- If the issue remains unresolved, contact support@ibspot.com for assistance.
Damaged or Lost Parcels
If your package arrives damaged or fails to arrive, please contact us immediately. For deliveries to P.O. boxes, ibspot is not responsible for damage caused by weather, temperature, or theft.
Customer Support
For any questions about shipping, tracking, or delivery, our customer support team is here to help.
Email: support@ibspot.com
We’re always happy to help.
Please read our policy carefully before making a purchase.
We aim to ensure every customer has a smooth and transparent experience with ibspot.com.
Order Cancellation Policy
Customers may request to cancel an order before it has been shipped.
Once the package has been shipped, cancellations are no longer possible; however, you may still request a return after receiving your order.
How to Request a Cancellation
You can contact us through:
-
Email: support@ibspot.com
-
Contact Form: Submit a request through our Contact Us page
Please submit your cancellation request as soon as possible after placing the order to allow us to process it before shipment.
Return Policy
We accept returns for most items within 30 days of delivery for a full refund.
To be eligible for a return:
-
The item must be unused, in the same condition as received, and in its original packaging.
-
A tracking number must be provided to confirm the return shipment.
Non-Returnable Items
Certain products cannot be returned, including:
-
Perishable goods (for example, food, flowers, newspapers, magazines)
-
Intimate or sanitary goods
-
Hazardous materials or flammable liquids/gases
-
Gift cards
-
Downloadable software
-
Some health and personal care items
Partial Refunds (If Applicable)
Partial refunds may be granted in specific situations, such as:
-
Books with obvious signs of use
-
Opened CDs, DVDs, software, or vinyl records
-
Items not in their original condition, damaged, or missing parts not due to our error
-
Items returned more than 30 days after delivery
How to Return an Item
To initiate a return, please contact us at support@ibspot.com with your order number and details about the product you wish to return.
Our team will provide you with return instructions and a prepaid return label.
Shipping Cost for Returns
Please contact us before returning any item.
We will provide a free return shipping label.
If a return is sent back without prior contact or without our provided label, we cannot be held responsible for return shipping costs.
For items valued over $75, we recommend using a trackable shipping service or purchasing shipping insurance.
We cannot guarantee that we will receive your returned item if shipped independently.
Refund Processing
Once your return is received and inspected:
-
In-store returns are refunded to the original form of payment or issued as a gift card.
-
Mail-in returns using our prepaid label are refunded to the original payment method within 3–5 business days after we receive your return.
Please allow:
-
5–7 business days for the return to reach our Returns Center.
-
An additional 3–10 business days for your bank to post the refund to your account.
Damages, Issues & Claims
Please inspect your order immediately upon receipt.
If you receive a defective, damaged, or incorrect item, contact us right away at support@ibspot.com.
We’ll evaluate the issue promptly and make it right.
Product Claims
Before purchasing, please review product details carefully.
If there is a problem with your order upon arrival, visit our Support Center or contact us directly to arrange return shipping or replacement.
Exchanges
We do not process direct exchanges.
The fastest way to get what you need is to return the original item and place a new order once your return is accepted.
Return Address
IBSPOT Return Center
15 Sawmill Ln
Dover Plains, NY 12522
United States
Customer Support
Our support team is available 24/7 to assist with cancellations, returns, or general inquiries.
Email: support@ibspot.com
Contact Form: Contact Us page
Oops!
Sorry, it looks like some products are not available in selected quantity.