


ShopTJB 3-Color Dimmable Solar Landscape 4"x8" Brick Paver Lights w/Remote Control
$105.01
- Free US shipping
-
Arrives
4" x 8" Solar Brick Paver & Landscape Dimmable/Programable Light (Version 2.0)4” x 8” Solar Brick Paver & Landscape Light V2.0 featuring the Solar Module System for Years of Worry Free Operation Install in Driveways, Walkways, Landscaping, Pool Decks, or Wherever Ground Accent Lighting is Desired
Note:Li stands for Lithium, the materials used in our battery. Unlike NiCad batteries, they are not made with heavy metals and they can store up to 200% more power than NiCad batteries and do not suffer from memory effects. That is why our lights stay on longer!
Installation In Concrete/Stamped Concrete I will try to explain some of the techniques that we have used for our installation of our Solar Brick Paver Lights into new concrete surfaces. Always test your lights before you set them into concrete. Wrap the light fixture in plastic wrap (IE: Saran Wrap, Clear Wrap, Stretch-Tight, etc.). This prevents the concrete from getting on the fixture and from staining it.
Well, there are my (3) basic tips that have worked well for our installation crews. If you are doing stamped concrete, a little extra care is needed when pressing down the form molds so as not to press the light fixture too deep into the concrete. Good Luck with your project and don't forget to send me photos that I can share with others! Operating Instructions for the 4” x 8” Solar Brick Landscape Light Each box contains one (1) 4” x 8” solar brick landscape light + (1) Hand-Held Remote Control. The light is comprised of a lens, rubber gasket, solar module, (2) styrofoam spacers and an ABS base. The solar light module contains (48) adjustable LED's and (18) solar panels on the top for recharging.. The Solar Brick Landscape Light can be installed permanently in concrete, imbedded within your brick pavers, lining the driveway, sidewalk, patio, pool deck or placed wherever decorative landscape lighting is desired. Make sure to install them where they have full access to the sun most of the day. The Solar Brick Landscape Light should illuminate for up to 10+ hours in the spring and summer months and somewhat less in the fall and winter. Your Solar Brick Landscape Light will automatically turn on at night when the sun goes down and shut off when the sun comes up or when the battery as been fully discharged. During the daylight hours, the solar panels convert the sun’s energy into electricity and charges the 3.2 Volt 1,800 mAH Rechargeable Metal Lithium battery. The rechargeable metal lithium battery should last for up to 10 years or 4000 recharges. NOTE: It is important that when you reassemble the light to ensure the gasket is smoothed down completely to be flush with the raised lip on the inside of the light base. Tighten the screws firmly to make certain that the solar light is sealed properly DO NOT OVER TIGHTEN. (It will warp the lens and water can seep into the solar light and can damage the electronic components). HOW DOES IT WORK? If you have a yard and have ever thought about lighting it at night, then you have probably heard about solar yard lights. As long as a location gets direct sunlight, you can put a light there and have light at night for several hrs. These lights are extremely interesting because they are almost like mini satellites. They generate and store their own power during the day and then release it at night. This is just like a satellite that stores solar energy while it is on the sunny side of the planet and then uses that energy when it's on the dark side. A solar yard light uses standard solar cells in a very straightforward application. A single solar cell produces a maximum of 0.5 volts and a varying amount of current depending on the size of the cell and the amount of light striking the surface in full, bright sunlight. The solar cells are wired directly to the battery through a diode (which prevents the battery's current from flowing back through the solar cell at night). our battery is a high-powered rechargeable metal lithium battery. A battery like this produces about 2.5 volts and can store a maximum of approximately 1800 milliamp-hours. During the day, the battery charges, reaching maximum charge except on shorter winter days or days when there is heavy overcast. At night, the solar cells stop producing power. The photo resistor turns on the LED. The controller board accepts power from the solar cell and battery, as well as input from the photo resistor. It has a three-transistor photocell circuit that turns on the LED when the photo resistor indicates darkness. LEDs draw about 45 milliamps with the battery producing about 1.23 volts (0.055 watts). It produces about half of the light that a candle would. The Rechargeable metal lithium battery, when fully charged, can operate the LED for about up to 10 hrs. on this 4" x 8" light. Half of a candle's light is not very much, and if you have ever purchased one of these yard lights you know that it really is not enough to provide illumination. You use them more for marking a trail or pathway -- they are bright enough to see, but not really bright enough to illuminate the ground to any great degree. They help define borders, pathways, & stairways. Use them in walkways, patios, driveways, pool deck, stairways & along garden paths. Due to the lower output, bugs are not as attracted to them as they are to other outdoor lighting. In late Spring, Summer and early Autumn the Solar Paver lights will fully charge on most days giving them enough charge to light for up to 12 hours. In winter the Solar Paver lights will charge up enough to light for up to 6 hours on all but the most unfavorable of winter weather days unless covered by snow. How To Replace the Battery/Solar Module? Remove the lens cover by unscrewing the ten screws with an Allen wrench. Remove the lens and rubber gasket and set them aside. Then use a flat head screwdriver to remove the solar module. (It will probably break but you are replacing it.) Then replace the solar module with a new one. Reverse the procedure to seal everything back up. Apply a thin bead of silicone between the lens and the rubber gasket to help seal out water. Tighten the screws firmly; be sure not to over tighten and strip the screws. How water resistant are they? Water resistance is rated by the IP (International Protection) system which consists of the letters IP followed by two digits. The first digit after IP ranks a products protection against solid objects. The second digit after the IP rates a products ability to protect against liquids. *Installation Tip* In areas that experience freeze thaw cycles during the winter months, we have found a neat way to secure the lights into your installation. Before installing the Solar Paver Light into your pavers, spray a little expanding foam (Great Stuff, Black Waterfall Foam, Etc.) into the space where the fixture will be installed. Then put the fixture into the space. The expanding foam will fill any void spaces and will adhere the fixture to all adjoining pavers. You must put some weight on top of the fixture as the expanding foam dries so that the foam does not push the fixture out of the space. Once the foam has dried, remove the weight. If any foam came up between the fixture and adjoining pavers, allow the foam to dry and cut off any extra with a knife. (Next time use less foam!). Why do the lights not stay on the same amount of time? The amount of time a solar light will stay lit is based upon several different factors. First and most important is the amount and angle of sunlight the solar panels receive and can send the power to the rechargeable battery. Late Spring & Early Summertime sun is strongest because it is straight up in the sky. Fall, spring, & winter, the sun is lower in the horizon and does not provide as much power to the solar panels so the LEDs will not stay on as long. If you have a light that is not staying on as long as the other lights, a simple test is to open up the fixture and remove the solar light module. Then place the module in a direct sunlight area that is lit for most of the day. Observe the light that night. Do the LED’s stay lighted longer than before? If yes, lack of sunlight is the problem. If no, then there may be an issue with the battery. Over-hanging shrub and tree branches, long grass, dirt/debris on the lens or structures that provide shade for the area also block the amount of sun to power the solar panels resulting in less output to the battery. If leaves or dirt accumulate on the lenses, this will cut back on the power available to recharge the battery. Finally, rechargeable batteries have a certain amount of charge/discharge cycles before they no long will hold a charge. Ni-Cad batteries are the least expensive and have 300-500 cycles before needing replacement. Rechargeable metal lithium batteries (used by Solar Brick Paver Lights) cost more but can last 100 times as long as Ni-Cad rechargeable batteries. Why do the lights Flicker? LED lights will flicker if they are just about to run out of power or if the photocell is receiving extra light that causes the photocell to cycle on-off-on-off-on-etc. This extra light can come from outdoor lights on houses or buildings, very bright LED streetlights, and security lighting. If this flickering happens on a regular basis around the same time, then the problem is most likely environmental. As they are solar powered. When the environment brightness is getting at the critical point of charging voltage and discharging voltage, environment brightness is not stable and will cause voltage on solar panel not stable, may lead to repeatedly charging and discharging, thus LED’s flickering or repeatedly on and off. Because the solar panel is very sensitive to surrounding brightness. When the surrounding area is all dark or all bright that passed the charging and discharging critical point, solar brick light will work well again. That is normal in solar products. To check the battery, follow instructions in the above section. If battery is OK, then check to see if there is other ambient light that might be tripping the photocell. You can do this by removing the solar module (see above) and moving it to a different location where there is more darkness at nighttime (but sunny during the day). Check to see if the lights flicker in a different area. If yes, and the battery has checked out as ok, then you may have a module problem and require a replacement. Why is there water under the lens? Because the fixture properly sealed, sometimes there will be condensation under the lens if the weather is conducive to this. This is normal and will not affect the solar module. When the LED’s are on, they generate a little heat that will dry up the condensate water. When the outside air temperatures become lower than the air temperatures in the fixture, condensate will form. Nothing can be done about this. It is normal and will not damage the fixture. The condensate will eventually disappear as the two different temperature regulate. It is just like if you park your closed car outside overnight. Some mornings you will have dew on the windows and some mornings you will not. If you leave the car alone, the dew disappears throughout the day. Same with the Solar Brick Lights. The main issue we have had with the lights is installers who overtighten the (6) hex screws and warp the lens. This allows water to get into the light fixture and eventually into the electronics. On Version 2.0, we removed the internal switch and added a silicone sealant between the lens and the rubber gasket. Basically, just snug the lens screws. Do not crank them super tight or the lens will warp allowing water to get inside of the black base. The top (6) Stainless Screws have been pre-tightened at the factory as well as a layer of silicone between the lens and the rubber gasket. If necessary, you can drill hole(s) in the bottom of the base to allow water to drain out of the base. This works best in applications where there is a bedding course of sand between the top of the stone base and the bottom of the pavers. Do not make these holes if the fixture is in an area where water puddles. Holes in this situation will allow water to enter up from the bottom and destroy the electronic module. How do I get a screw out of the lens that is too tight/stripped? If you run into a screw that is in too tight or has gotten stripped and you cannot remove it, follow these instructions. Use a rubber band that is wider than the hex head opening of the screw top. Lay the rubber band directly over where the Allen wrench goes into the top. Apply a little down pressure and turn the Allen wrench counterclockwise. The rubber band will fill the extra space allowing the Allen wrench to grab the screw and let you unscrew the screw. The screws are M5 x 16 mil Socket Cap (Allen Head) Stainless Steel Socket Cap Screw. How do I fill sand around the fixture? Most installations, the customer just places the light and does not sand. Remember these are sold all over North America. Usually it is only paver installers that want to put polymeric sand around the light fixture. We tell these installers to use an expanding foam (IE: Great Stuff, or black waterfall foam) that is available at any local hardware store. Spray a small bead along both sides and then place the fixture down into the foam. Hold the fixture in place (otherwise it will rise up with the foam) for a minute or two allowing for the foam to expand and fill the voids between the fins. Once dry, polymeric sand can be added to fill any remaining gap. By using the foam method, you eliminate the fixture from frost heaving, floating in heavy rains, & deter theft. NOTE: If too much foam is sprayed into the hole and oozes up between the fixture and the surrounding pavers, do not panic! Wait until the foam dries then you can easily break it off flush or just below flush level with the fixture. How do I install the light if my pavers are not 4" x 8"? Not a problem! Just use a concrete saw to cut out a 4" x 8" space in your installation. Sometimes this can be an "L" shape out of a 6" x 9" paver, or 4" x 4" square in (2) adjoining pavers. See the customer supplied photos below to see how others have made this work in their installations. We designed these lights to be able to be used in a wide array of applications from interlocking pavers around walkways, patios, & driveways; Clay bricks; Poured concrete; Bluestone; Gravel, & Turf installations. You just have to be a little creative sometimes in figuring out a solution that will work. If you have a unique installation that you would like to share, please send us some photos and we will post it for others to be inspired! WARRANTY RETURN PROCEDURE Once you have determined what the exact problem is with your light fixture and require a replacement part, let us know which part you need. If it is within the 1-year warranty period, we will send out the replacement part to you. (Note: Modules may require a return and a RA #). Photos send to us by our customers showing the Solar Brick Paver Lights |
- Free 30-Day Returns
- Full Refund for Damaged or Incorrect Items
- Guaranteed Delivery or Money Back
- Secure Checkout & Fast Support
4" x 8" Solar Brick Paver & Landscape Dimmable/Programable Light (Version 2.0)4” x 8” Solar Brick Paver & Landscape Light V2.0 featuring the Solar Module System for Years of Worry Free Operation Install in Driveways, Walkways, Landscaping, Pool Decks, or Wherever Ground Accent Lighting is Desired
Note:Li stands for Lithium, the materials used in our battery. Unlike NiCad batteries, they are not made with heavy metals and they can store up to 200% more power than NiCad batteries and do not suffer from memory effects. That is why our lights stay on longer!
Installation In Concrete/Stamped Concrete I will try to explain some of the techniques that we have used for our installation of our Solar Brick Paver Lights into new concrete surfaces. Always test your lights before you set them into concrete. Wrap the light fixture in plastic wrap (IE: Saran Wrap, Clear Wrap, Stretch-Tight, etc.). This prevents the concrete from getting on the fixture and from staining it.
Well, there are my (3) basic tips that have worked well for our installation crews. If you are doing stamped concrete, a little extra care is needed when pressing down the form molds so as not to press the light fixture too deep into the concrete. Good Luck with your project and don't forget to send me photos that I can share with others! Operating Instructions for the 4” x 8” Solar Brick Landscape Light Each box contains one (1) 4” x 8” solar brick landscape light + (1) Hand-Held Remote Control. The light is comprised of a lens, rubber gasket, solar module, (2) styrofoam spacers and an ABS base. The solar light module contains (48) adjustable LED's and (18) solar panels on the top for recharging.. The Solar Brick Landscape Light can be installed permanently in concrete, imbedded within your brick pavers, lining the driveway, sidewalk, patio, pool deck or placed wherever decorative landscape lighting is desired. Make sure to install them where they have full access to the sun most of the day. The Solar Brick Landscape Light should illuminate for up to 10+ hours in the spring and summer months and somewhat less in the fall and winter. Your Solar Brick Landscape Light will automatically turn on at night when the sun goes down and shut off when the sun comes up or when the battery as been fully discharged. During the daylight hours, the solar panels convert the sun’s energy into electricity and charges the 3.2 Volt 1,800 mAH Rechargeable Metal Lithium battery. The rechargeable metal lithium battery should last for up to 10 years or 4000 recharges. NOTE: It is important that when you reassemble the light to ensure the gasket is smoothed down completely to be flush with the raised lip on the inside of the light base. Tighten the screws firmly to make certain that the solar light is sealed properly DO NOT OVER TIGHTEN. (It will warp the lens and water can seep into the solar light and can damage the electronic components). HOW DOES IT WORK? If you have a yard and have ever thought about lighting it at night, then you have probably heard about solar yard lights. As long as a location gets direct sunlight, you can put a light there and have light at night for several hrs. These lights are extremely interesting because they are almost like mini satellites. They generate and store their own power during the day and then release it at night. This is just like a satellite that stores solar energy while it is on the sunny side of the planet and then uses that energy when it's on the dark side. A solar yard light uses standard solar cells in a very straightforward application. A single solar cell produces a maximum of 0.5 volts and a varying amount of current depending on the size of the cell and the amount of light striking the surface in full, bright sunlight. The solar cells are wired directly to the battery through a diode (which prevents the battery's current from flowing back through the solar cell at night). our battery is a high-powered rechargeable metal lithium battery. A battery like this produces about 2.5 volts and can store a maximum of approximately 1800 milliamp-hours. During the day, the battery charges, reaching maximum charge except on shorter winter days or days when there is heavy overcast. At night, the solar cells stop producing power. The photo resistor turns on the LED. The controller board accepts power from the solar cell and battery, as well as input from the photo resistor. It has a three-transistor photocell circuit that turns on the LED when the photo resistor indicates darkness. LEDs draw about 45 milliamps with the battery producing about 1.23 volts (0.055 watts). It produces about half of the light that a candle would. The Rechargeable metal lithium battery, when fully charged, can operate the LED for about up to 10 hrs. on this 4" x 8" light. Half of a candle's light is not very much, and if you have ever purchased one of these yard lights you know that it really is not enough to provide illumination. You use them more for marking a trail or pathway -- they are bright enough to see, but not really bright enough to illuminate the ground to any great degree. They help define borders, pathways, & stairways. Use them in walkways, patios, driveways, pool deck, stairways & along garden paths. Due to the lower output, bugs are not as attracted to them as they are to other outdoor lighting. In late Spring, Summer and early Autumn the Solar Paver lights will fully charge on most days giving them enough charge to light for up to 12 hours. In winter the Solar Paver lights will charge up enough to light for up to 6 hours on all but the most unfavorable of winter weather days unless covered by snow. How To Replace the Battery/Solar Module? Remove the lens cover by unscrewing the ten screws with an Allen wrench. Remove the lens and rubber gasket and set them aside. Then use a flat head screwdriver to remove the solar module. (It will probably break but you are replacing it.) Then replace the solar module with a new one. Reverse the procedure to seal everything back up. Apply a thin bead of silicone between the lens and the rubber gasket to help seal out water. Tighten the screws firmly; be sure not to over tighten and strip the screws. How water resistant are they? Water resistance is rated by the IP (International Protection) system which consists of the letters IP followed by two digits. The first digit after IP ranks a products protection against solid objects. The second digit after the IP rates a products ability to protect against liquids. *Installation Tip* In areas that experience freeze thaw cycles during the winter months, we have found a neat way to secure the lights into your installation. Before installing the Solar Paver Light into your pavers, spray a little expanding foam (Great Stuff, Black Waterfall Foam, Etc.) into the space where the fixture will be installed. Then put the fixture into the space. The expanding foam will fill any void spaces and will adhere the fixture to all adjoining pavers. You must put some weight on top of the fixture as the expanding foam dries so that the foam does not push the fixture out of the space. Once the foam has dried, remove the weight. If any foam came up between the fixture and adjoining pavers, allow the foam to dry and cut off any extra with a knife. (Next time use less foam!). Why do the lights not stay on the same amount of time? The amount of time a solar light will stay lit is based upon several different factors. First and most important is the amount and angle of sunlight the solar panels receive and can send the power to the rechargeable battery. Late Spring & Early Summertime sun is strongest because it is straight up in the sky. Fall, spring, & winter, the sun is lower in the horizon and does not provide as much power to the solar panels so the LEDs will not stay on as long. If you have a light that is not staying on as long as the other lights, a simple test is to open up the fixture and remove the solar light module. Then place the module in a direct sunlight area that is lit for most of the day. Observe the light that night. Do the LED’s stay lighted longer than before? If yes, lack of sunlight is the problem. If no, then there may be an issue with the battery. Over-hanging shrub and tree branches, long grass, dirt/debris on the lens or structures that provide shade for the area also block the amount of sun to power the solar panels resulting in less output to the battery. If leaves or dirt accumulate on the lenses, this will cut back on the power available to recharge the battery. Finally, rechargeable batteries have a certain amount of charge/discharge cycles before they no long will hold a charge. Ni-Cad batteries are the least expensive and have 300-500 cycles before needing replacement. Rechargeable metal lithium batteries (used by Solar Brick Paver Lights) cost more but can last 100 times as long as Ni-Cad rechargeable batteries. Why do the lights Flicker? LED lights will flicker if they are just about to run out of power or if the photocell is receiving extra light that causes the photocell to cycle on-off-on-off-on-etc. This extra light can come from outdoor lights on houses or buildings, very bright LED streetlights, and security lighting. If this flickering happens on a regular basis around the same time, then the problem is most likely environmental. As they are solar powered. When the environment brightness is getting at the critical point of charging voltage and discharging voltage, environment brightness is not stable and will cause voltage on solar panel not stable, may lead to repeatedly charging and discharging, thus LED’s flickering or repeatedly on and off. Because the solar panel is very sensitive to surrounding brightness. When the surrounding area is all dark or all bright that passed the charging and discharging critical point, solar brick light will work well again. That is normal in solar products. To check the battery, follow instructions in the above section. If battery is OK, then check to see if there is other ambient light that might be tripping the photocell. You can do this by removing the solar module (see above) and moving it to a different location where there is more darkness at nighttime (but sunny during the day). Check to see if the lights flicker in a different area. If yes, and the battery has checked out as ok, then you may have a module problem and require a replacement. Why is there water under the lens? Because the fixture properly sealed, sometimes there will be condensation under the lens if the weather is conducive to this. This is normal and will not affect the solar module. When the LED’s are on, they generate a little heat that will dry up the condensate water. When the outside air temperatures become lower than the air temperatures in the fixture, condensate will form. Nothing can be done about this. It is normal and will not damage the fixture. The condensate will eventually disappear as the two different temperature regulate. It is just like if you park your closed car outside overnight. Some mornings you will have dew on the windows and some mornings you will not. If you leave the car alone, the dew disappears throughout the day. Same with the Solar Brick Lights. The main issue we have had with the lights is installers who overtighten the (6) hex screws and warp the lens. This allows water to get into the light fixture and eventually into the electronics. On Version 2.0, we removed the internal switch and added a silicone sealant between the lens and the rubber gasket. Basically, just snug the lens screws. Do not crank them super tight or the lens will warp allowing water to get inside of the black base. The top (6) Stainless Screws have been pre-tightened at the factory as well as a layer of silicone between the lens and the rubber gasket. If necessary, you can drill hole(s) in the bottom of the base to allow water to drain out of the base. This works best in applications where there is a bedding course of sand between the top of the stone base and the bottom of the pavers. Do not make these holes if the fixture is in an area where water puddles. Holes in this situation will allow water to enter up from the bottom and destroy the electronic module. How do I get a screw out of the lens that is too tight/stripped? If you run into a screw that is in too tight or has gotten stripped and you cannot remove it, follow these instructions. Use a rubber band that is wider than the hex head opening of the screw top. Lay the rubber band directly over where the Allen wrench goes into the top. Apply a little down pressure and turn the Allen wrench counterclockwise. The rubber band will fill the extra space allowing the Allen wrench to grab the screw and let you unscrew the screw. The screws are M5 x 16 mil Socket Cap (Allen Head) Stainless Steel Socket Cap Screw. How do I fill sand around the fixture? Most installations, the customer just places the light and does not sand. Remember these are sold all over North America. Usually it is only paver installers that want to put polymeric sand around the light fixture. We tell these installers to use an expanding foam (IE: Great Stuff, or black waterfall foam) that is available at any local hardware store. Spray a small bead along both sides and then place the fixture down into the foam. Hold the fixture in place (otherwise it will rise up with the foam) for a minute or two allowing for the foam to expand and fill the voids between the fins. Once dry, polymeric sand can be added to fill any remaining gap. By using the foam method, you eliminate the fixture from frost heaving, floating in heavy rains, & deter theft. NOTE: If too much foam is sprayed into the hole and oozes up between the fixture and the surrounding pavers, do not panic! Wait until the foam dries then you can easily break it off flush or just below flush level with the fixture. How do I install the light if my pavers are not 4" x 8"? Not a problem! Just use a concrete saw to cut out a 4" x 8" space in your installation. Sometimes this can be an "L" shape out of a 6" x 9" paver, or 4" x 4" square in (2) adjoining pavers. See the customer supplied photos below to see how others have made this work in their installations. We designed these lights to be able to be used in a wide array of applications from interlocking pavers around walkways, patios, & driveways; Clay bricks; Poured concrete; Bluestone; Gravel, & Turf installations. You just have to be a little creative sometimes in figuring out a solution that will work. If you have a unique installation that you would like to share, please send us some photos and we will post it for others to be inspired! WARRANTY RETURN PROCEDURE Once you have determined what the exact problem is with your light fixture and require a replacement part, let us know which part you need. If it is within the 1-year warranty period, we will send out the replacement part to you. (Note: Modules may require a return and a RA #). Photos send to us by our customers showing the Solar Brick Paver Lights |
4" x 8" Solar Brick Paver & Landscape Dimmable/Programable Light (Version 2.0)4” x 8” Solar Brick Paver & Landscape Light V2.0 featuring the Solar Module System for Years of Worry Free Operation Install in Driveways, Walkways, Landscaping, Pool Decks, or Wherever Ground Accent Lighting is Desired
Note:Li stands for Lithium, the materials used in our battery. Unlike NiCad batteries, they are not made with heavy metals and they can store up to 200% more power than NiCad batteries and do not suffer from memory effects. That is why our lights stay on longer!
Installation In Concrete/Stamped Concrete I will try to explain some of the techniques that we have used for our installation of our Solar Brick Paver Lights into new concrete surfaces. Always test your lights before you set them into concrete. Wrap the light fixture in plastic wrap (IE: Saran Wrap, Clear Wrap, Stretch-Tight, etc.). This prevents the concrete from getting on the fixture and from staining it.
Well, there are my (3) basic tips that have worked well for our installation crews. If you are doing stamped concrete, a little extra care is needed when pressing down the form molds so as not to press the light fixture too deep into the concrete. Good Luck with your project and don't forget to send me photos that I can share with others! Operating Instructions for the 4” x 8” Solar Brick Landscape Light Each box contains one (1) 4” x 8” solar brick landscape light + (1) Hand-Held Remote Control. The light is comprised of a lens, rubber gasket, solar module, (2) styrofoam spacers and an ABS base. The solar light module contains (48) adjustable LED's and (18) solar panels on the top for recharging.. The Solar Brick Landscape Light can be installed permanently in concrete, imbedded within your brick pavers, lining the driveway, sidewalk, patio, pool deck or placed wherever decorative landscape lighting is desired. Make sure to install them where they have full access to the sun most of the day. The Solar Brick Landscape Light should illuminate for up to 10+ hours in the spring and summer months and somewhat less in the fall and winter. Your Solar Brick Landscape Light will automatically turn on at night when the sun goes down and shut off when the sun comes up or when the battery as been fully discharged. During the daylight hours, the solar panels convert the sun’s energy into electricity and charges the 3.2 Volt 1,800 mAH Rechargeable Metal Lithium battery. The rechargeable metal lithium battery should last for up to 10 years or 4000 recharges. NOTE: It is important that when you reassemble the light to ensure the gasket is smoothed down completely to be flush with the raised lip on the inside of the light base. Tighten the screws firmly to make certain that the solar light is sealed properly DO NOT OVER TIGHTEN. (It will warp the lens and water can seep into the solar light and can damage the electronic components). HOW DOES IT WORK? If you have a yard and have ever thought about lighting it at night, then you have probably heard about solar yard lights. As long as a location gets direct sunlight, you can put a light there and have light at night for several hrs. These lights are extremely interesting because they are almost like mini satellites. They generate and store their own power during the day and then release it at night. This is just like a satellite that stores solar energy while it is on the sunny side of the planet and then uses that energy when it's on the dark side. A solar yard light uses standard solar cells in a very straightforward application. A single solar cell produces a maximum of 0.5 volts and a varying amount of current depending on the size of the cell and the amount of light striking the surface in full, bright sunlight. The solar cells are wired directly to the battery through a diode (which prevents the battery's current from flowing back through the solar cell at night). our battery is a high-powered rechargeable metal lithium battery. A battery like this produces about 2.5 volts and can store a maximum of approximately 1800 milliamp-hours. During the day, the battery charges, reaching maximum charge except on shorter winter days or days when there is heavy overcast. At night, the solar cells stop producing power. The photo resistor turns on the LED. The controller board accepts power from the solar cell and battery, as well as input from the photo resistor. It has a three-transistor photocell circuit that turns on the LED when the photo resistor indicates darkness. LEDs draw about 45 milliamps with the battery producing about 1.23 volts (0.055 watts). It produces about half of the light that a candle would. The Rechargeable metal lithium battery, when fully charged, can operate the LED for about up to 10 hrs. on this 4" x 8" light. Half of a candle's light is not very much, and if you have ever purchased one of these yard lights you know that it really is not enough to provide illumination. You use them more for marking a trail or pathway -- they are bright enough to see, but not really bright enough to illuminate the ground to any great degree. They help define borders, pathways, & stairways. Use them in walkways, patios, driveways, pool deck, stairways & along garden paths. Due to the lower output, bugs are not as attracted to them as they are to other outdoor lighting. In late Spring, Summer and early Autumn the Solar Paver lights will fully charge on most days giving them enough charge to light for up to 12 hours. In winter the Solar Paver lights will charge up enough to light for up to 6 hours on all but the most unfavorable of winter weather days unless covered by snow. How To Replace the Battery/Solar Module? Remove the lens cover by unscrewing the ten screws with an Allen wrench. Remove the lens and rubber gasket and set them aside. Then use a flat head screwdriver to remove the solar module. (It will probably break but you are replacing it.) Then replace the solar module with a new one. Reverse the procedure to seal everything back up. Apply a thin bead of silicone between the lens and the rubber gasket to help seal out water. Tighten the screws firmly; be sure not to over tighten and strip the screws. How water resistant are they? Water resistance is rated by the IP (International Protection) system which consists of the letters IP followed by two digits. The first digit after IP ranks a products protection against solid objects. The second digit after the IP rates a products ability to protect against liquids. *Installation Tip* In areas that experience freeze thaw cycles during the winter months, we have found a neat way to secure the lights into your installation. Before installing the Solar Paver Light into your pavers, spray a little expanding foam (Great Stuff, Black Waterfall Foam, Etc.) into the space where the fixture will be installed. Then put the fixture into the space. The expanding foam will fill any void spaces and will adhere the fixture to all adjoining pavers. You must put some weight on top of the fixture as the expanding foam dries so that the foam does not push the fixture out of the space. Once the foam has dried, remove the weight. If any foam came up between the fixture and adjoining pavers, allow the foam to dry and cut off any extra with a knife. (Next time use less foam!). Why do the lights not stay on the same amount of time? The amount of time a solar light will stay lit is based upon several different factors. First and most important is the amount and angle of sunlight the solar panels receive and can send the power to the rechargeable battery. Late Spring & Early Summertime sun is strongest because it is straight up in the sky. Fall, spring, & winter, the sun is lower in the horizon and does not provide as much power to the solar panels so the LEDs will not stay on as long. If you have a light that is not staying on as long as the other lights, a simple test is to open up the fixture and remove the solar light module. Then place the module in a direct sunlight area that is lit for most of the day. Observe the light that night. Do the LED’s stay lighted longer than before? If yes, lack of sunlight is the problem. If no, then there may be an issue with the battery. Over-hanging shrub and tree branches, long grass, dirt/debris on the lens or structures that provide shade for the area also block the amount of sun to power the solar panels resulting in less output to the battery. If leaves or dirt accumulate on the lenses, this will cut back on the power available to recharge the battery. Finally, rechargeable batteries have a certain amount of charge/discharge cycles before they no long will hold a charge. Ni-Cad batteries are the least expensive and have 300-500 cycles before needing replacement. Rechargeable metal lithium batteries (used by Solar Brick Paver Lights) cost more but can last 100 times as long as Ni-Cad rechargeable batteries. Why do the lights Flicker? LED lights will flicker if they are just about to run out of power or if the photocell is receiving extra light that causes the photocell to cycle on-off-on-off-on-etc. This extra light can come from outdoor lights on houses or buildings, very bright LED streetlights, and security lighting. If this flickering happens on a regular basis around the same time, then the problem is most likely environmental. As they are solar powered. When the environment brightness is getting at the critical point of charging voltage and discharging voltage, environment brightness is not stable and will cause voltage on solar panel not stable, may lead to repeatedly charging and discharging, thus LED’s flickering or repeatedly on and off. Because the solar panel is very sensitive to surrounding brightness. When the surrounding area is all dark or all bright that passed the charging and discharging critical point, solar brick light will work well again. That is normal in solar products. To check the battery, follow instructions in the above section. If battery is OK, then check to see if there is other ambient light that might be tripping the photocell. You can do this by removing the solar module (see above) and moving it to a different location where there is more darkness at nighttime (but sunny during the day). Check to see if the lights flicker in a different area. If yes, and the battery has checked out as ok, then you may have a module problem and require a replacement. Why is there water under the lens? Because the fixture properly sealed, sometimes there will be condensation under the lens if the weather is conducive to this. This is normal and will not affect the solar module. When the LED’s are on, they generate a little heat that will dry up the condensate water. When the outside air temperatures become lower than the air temperatures in the fixture, condensate will form. Nothing can be done about this. It is normal and will not damage the fixture. The condensate will eventually disappear as the two different temperature regulate. It is just like if you park your closed car outside overnight. Some mornings you will have dew on the windows and some mornings you will not. If you leave the car alone, the dew disappears throughout the day. Same with the Solar Brick Lights. The main issue we have had with the lights is installers who overtighten the (6) hex screws and warp the lens. This allows water to get into the light fixture and eventually into the electronics. On Version 2.0, we removed the internal switch and added a silicone sealant between the lens and the rubber gasket. Basically, just snug the lens screws. Do not crank them super tight or the lens will warp allowing water to get inside of the black base. The top (6) Stainless Screws have been pre-tightened at the factory as well as a layer of silicone between the lens and the rubber gasket. If necessary, you can drill hole(s) in the bottom of the base to allow water to drain out of the base. This works best in applications where there is a bedding course of sand between the top of the stone base and the bottom of the pavers. Do not make these holes if the fixture is in an area where water puddles. Holes in this situation will allow water to enter up from the bottom and destroy the electronic module. How do I get a screw out of the lens that is too tight/stripped? If you run into a screw that is in too tight or has gotten stripped and you cannot remove it, follow these instructions. Use a rubber band that is wider than the hex head opening of the screw top. Lay the rubber band directly over where the Allen wrench goes into the top. Apply a little down pressure and turn the Allen wrench counterclockwise. The rubber band will fill the extra space allowing the Allen wrench to grab the screw and let you unscrew the screw. The screws are M5 x 16 mil Socket Cap (Allen Head) Stainless Steel Socket Cap Screw. How do I fill sand around the fixture? Most installations, the customer just places the light and does not sand. Remember these are sold all over North America. Usually it is only paver installers that want to put polymeric sand around the light fixture. We tell these installers to use an expanding foam (IE: Great Stuff, or black waterfall foam) that is available at any local hardware store. Spray a small bead along both sides and then place the fixture down into the foam. Hold the fixture in place (otherwise it will rise up with the foam) for a minute or two allowing for the foam to expand and fill the voids between the fins. Once dry, polymeric sand can be added to fill any remaining gap. By using the foam method, you eliminate the fixture from frost heaving, floating in heavy rains, & deter theft. NOTE: If too much foam is sprayed into the hole and oozes up between the fixture and the surrounding pavers, do not panic! Wait until the foam dries then you can easily break it off flush or just below flush level with the fixture. How do I install the light if my pavers are not 4" x 8"? 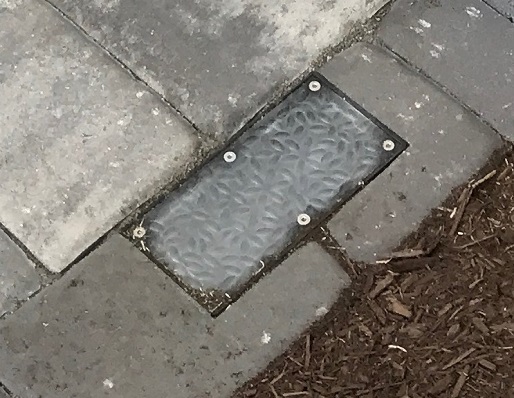 Not a problem! Just use a concrete saw to cut out a 4" x 8" space in your installation. Sometimes this can be an "L" shape out of a 6" x 9" paver, or 4" x 4" square in (2) adjoining pavers. See the customer supplied photos below to see how others have made this work in their installations. We designed these lights to be able to be used in a wide array of applications from interlocking pavers around walkways, patios, & driveways; Clay bricks; Poured concrete; Bluestone; Gravel, & Turf installations. You just have to be a little creative sometimes in figuring out a solution that will work. If you have a unique installation that you would like to share, please send us some photos and we will post it for others to be inspired! WARRANTY RETURN PROCEDURE Once you have determined what the exact problem is with your light fixture and require a replacement part, let us know which part you need. If it is within the 1-year warranty period, we will send out the replacement part to you. (Note: Modules may require a return and a RA #). Photos send to us by our customers showing the Solar Brick Paver Lights |
- Light Color: 6500K/4500K/3000K
- Shape: Rectangular
- Unit Count: 1
- Lighting Method: LED
- Part Number: Solar Brick v2.0
- Power Source: Solar Powered
- Installation Type: Recessed
- Specific Uses For Product: Garden, Driveway, Pathway, Patio, Walkway
- Size: 4" x 8" x 2 3/8"
- Included Components: paver lights, Remote Control
- Controller Type: Remote Control
- Item Length: 8"
- Special Features: Adjustable Color Temperature, Dimmable Brick lights, 8x4 Paver Li
- Control Style: Hand Held Remote
- Sensor Type: Light
- Item Height: 2 3/8"
- Voltage: 0.00
- Style: Paver Lights
- Features: Dimmer, Dusk-to-Dawn, Energy Efficient, Energy Saving, Timer, Waterproof
- Item Width: 4 in
- Special Feature: Adjustable Color Temperature, Dimmable Brick lights, 8x4 Paver Li
- Lighting Technology: LED
- Number of Settings: 11
- Model Name: Paver Lights
- Color Temperature: 6500K, 4500K, 3000K
- Number of Light Sources: 2
- Color: Cool White/Neutral White/Warm White
- Item Diameter: 4 in
- Material: Plastic Lens, ABS Case
- Installation Area: Outdoor
- Number of Lights: 1
- Brand: ShopTJB
- Mounting: Recessed
- Type: Pathway
- Dimmable: Yes
- Fixture Type: Recessed
- IP Rating: IP67
- Assembly Required: No
- Model: Solar Brick Light v2.0
- Theme: Garden
- Light Source Type: LED
- Country/Region of Manufacture: China
- Bulb Life Hours: 40,000+
- Country of Origin: China
- UPC: 7445047216268
Processing Time
- We process and ship orders Monday through Friday, excluding holidays.
- Most orders are processed within 1–3 business days, depending on product availability.
- Processing time does not include delivery time, which varies based on your location and the product’s shipping origin.
Shipping Coverage
We currently ship to addresses within the United States only.
Products may ship from:
- Our U.S. warehouses, or
- Our international fulfillment centers (including Korea, Japan, China, Australia, Mexico, Canada, the United Kingdom, and the EU).
Each product page clearly displays the “Ships From” location before checkout.
Shipping Methods & Estimated Delivery
| Shipping Method | Estimated Delivery | Cost |
|---|---|---|
| Free Shipping (US) | 5–10 business days | Free, available on eligible items |
| Standard Shipping (US to US by Item) | 5–10 business days | $5.95 for the first item, $3.00 each additional |
| Standard Shipping (From US Warehouse by Weight) | 3–7 business days | Starts at $5.95, increasing by $2 for every additional 4 oz (0.25 lb) up to 1 lb, then by $4 for each additional pound beyond 1 lb. |
| Extended Delivery (Ships from Overseas Warehouse) | 10–20 business days | $14.99 for the first item, $2.00 each additional |
Shipping costs vary by product weight, quantity and origin. Exact rates and delivery estimates are displayed on each product page and confirmed during checkout.
Free Shipping
We offer free standard shipping on select products or during promotional periods. Availability of free shipping will be displayed on the product page and at checkout.
Carriers
We primarily use USPS and UPS for U.S. deliveries. Items shipped from international warehouses may be handled by partner carriers depending on the country of origin.
Import Duties & Taxes
All import duties and taxes for goods imported into the United States are included in the product price. There are no hidden fees or additional charges at checkout.
Tracking & Notifications
Every order is fully trackable. You will receive a tracking number via email once your order ships. If your order ships in multiple packages, each package will have its own tracking number. If you don’t receive a shipping confirmation immediately, your order is still being processed and will arrive within the estimated timeframe shown at checkout.
You can track your shipment anytime using the Track Your Order page on our website.
Order Changes & Cancellations
If you need to modify or cancel an order, please contact our customer support team as soon as possible. Orders can only be canceled before they ship. Once shipped, cancellations are not possible, but you may request a return after the item is delivered.
Contact: support@ibspot.com
Item Not Received
If your tracking number shows “Delivered” but you haven’t received your package:
- Check with your local USPS or UPS office.
- Confirm that the shipping address provided was correct.
- If the issue remains unresolved, contact support@ibspot.com for assistance.
Damaged or Lost Parcels
If your package arrives damaged or fails to arrive, please contact us immediately. For deliveries to P.O. boxes, ibspot is not responsible for damage caused by weather, temperature, or theft.
Customer Support
For any questions about shipping, tracking, or delivery, our customer support team is here to help.
Email: support@ibspot.com
We’re always happy to help.
Please read our policy carefully before making a purchase.
We aim to ensure every customer has a smooth and transparent experience with ibspot.com.
Order Cancellation Policy
Customers may request to cancel an order before it has been shipped.
Once the package has been shipped, cancellations are no longer possible; however, you may still request a return after receiving your order.
How to Request a Cancellation
You can contact us through:
- Email: support@ibspot.com
- Contact Form: Submit a request through our Contact Us page
Please submit your cancellation request as soon as possible after placing the order to allow us to process it before shipment.
Return Policy
We accept returns for most items within 30 days of delivery for a full refund.
To be eligible for a return:
- The item must be unused, in the same condition as received, and in its original packaging.
- A tracking number must be provided to confirm the return shipment.
Non-Returnable Items
Certain products cannot be returned, including:
- Perishable goods (for example, food, flowers, newspapers, magazines)
- Intimate or sanitary goods
- Hazardous materials or flammable liquids/gases
- Gift cards
- Downloadable software
- Some health and personal care items
Partial Refunds (If Applicable)
Partial refunds may be granted in specific situations, such as:
- Books with obvious signs of use
- Opened CDs, DVDs, software, or vinyl records
- Items not in their original condition, damaged, or missing parts not due to our error
- Items returned more than 30 days after delivery
How to Return an Item
To initiate a return, please contact us at support@ibspot.com with your order number and details about the product you wish to return.
Our team will provide you with return instructions and a prepaid return label.
Shipping Cost for Returns
Please contact us before returning any item.
We may provide a return shipping label for your return. If the return is due to our error, such as receiving the wrong item, a damaged item, or a defective product, we will cover the return shipping cost.
If the return is due to the customer’s reason, such as ordering the wrong item, changing your mind, or no longer needing the item, the original shipping fee and the return label fee will be deducted from your refund amount.
If a return is sent back without prior contact or without using our provided label, we cannot be held responsible for any return shipping costs or delivery issues.
For items valued over $75, we recommend using a trackable shipping service or purchasing shipping insurance.
We cannot guarantee that we will receive your returned item if shipped independently.
Refund Processing
Once your return is received and inspected:
- In-store returns are refunded to the original form of payment or issued as a gift card.
- Mail-in returns using our prepaid label are refunded to the original payment method within 3–5 business days after we receive your return.
Please allow:
- 5–7 business days for the return to reach our Returns Center.
- An additional 3–10 business days for your bank to post the refund to your account.
Damages, Issues & Claims
Please inspect your order immediately upon receipt.
If you receive a defective, damaged, or incorrect item, contact us right away at support@ibspot.com.
We’ll evaluate the issue promptly and make it right.
Product Claims
Before purchasing, please review product details carefully.
If there is a problem with your order upon arrival, visit our Support Center or contact us directly to arrange return shipping or replacement.
Exchanges
We do not process direct exchanges.
The fastest way to get what you need is to return the original item and place a new order once your return is accepted.
Return Address
IBSPOT Return Center
15 Sawmill Ln
Dover Plains, NY 12522
United States
Customer Support
Our support team is available 24/7 to assist with cancellations, returns, or general inquiries.
Email: support@ibspot.com
Contact Form: Contact Us page
Oops!
Sorry, it looks like some products are not available in selected quantity.