


ExpensiveLightweightStuff.com Kawasaki ZRX1200R Alternator Starter Chain Tensioner
$165.17
- Free US shipping
-
Arrives
Hi, I'm KWICK from ExpensiveLightweightStuff. I have been producing the best starter/alternator fix for the Kawasaki's for way over a decade now. Zero failures, solid engineering, I have sold thousands. Easy for you, or your mechanic to install. On my site are the complete installation instructions at TensionerTamer.com
Fits: ZX10, ZX11C, ZX11D, GPZ750r, GPZ900r, GPZ1000rx, GPZ1100, ZZR1100, ZZR1200, Concours, ZRX1100 & ZRX1200R, using Kawasaki Tensioner part #39170-1059. Check Kawaski parts listings to check part number used on your Kawasaki 🙂
My new Tensioner
Tamer™ fixes not only the symptom of the tensioner arm hitting the
clutch, but also the actual problem of the lock plate slipping in the
first place.
The starter/alternator chain tensioner performs two functions:
1. It tensions the
chain when the motor is running and driving the alternator. In this
regard, my unit performs exactly the same as the spring loaded OEM
tensioner.
2. It tensions the chain when the starter operates.
This unit has an
adjustable, permanently fixed stop. It does not move and it has zero
clearance when installed. Expected normal wear allows less movement than
the stock adjuster does when operating the starter. It won’t need
adjustment. I include an extra one-use locknut for that purpose, but I
have reports of guys and gals running my Tensioner Tamer™ for over
100,000 miles and they have never touched it. You “can” adjust it, but
it is not necessary to do so.
Hy-Vo chains like to
be kept taught when running. The stock spring loaded arm does this on my
setup, just as it does with a stock tensioner.
Manual adjusters do
not have any spring tension and the chain can run loose, or with
inconsistent tension, when the motor is running. This is bad. I’ve
worked on many of the early Honda and Kawasakis from the 70’s-80’s (the
CB750F/900F/CBX for example) with Hy-Vo cam chains and manual cam chain
adjusters. If you weren’t religious about readjusting the lock nut and
letting the adjuster do it’s biz, the chains would wear out very
rapidly.
My New Tensioner
Tamer™ is made from a piece of CNC Machined billet 6061-T6 aluminum with
a gun-drilled Stainless Allen button head bolt, Stainless lock nut, a
12.8 grade anchor bolt with an Aircraft Stainless Locknut and comes with
your own tube of #262 Permanent Red LocTite.
Installation should take less than an hour.
Installation Supplies & Tools Needed:
-
The tools in your tool kit under the seat, or a reasonable facsimile thereof.
-
A really good inch/pound clicker torque wrench that goes down to 50 inch/pounds…OR…a Craftsmen Beam inch/pound torque wrench, they are about $25.00
-
A bottle of blue LocTite (Red comes with the Tensioner, but you’ll also need blue)
-
A couple smears of Silicone Sealant, any color.
-
A can of brake cleaner.
-
A Dremel with a bit to cut metal, like a Carborundum cutting wheel/disc.
-
The shop manual will be handy for those little details.
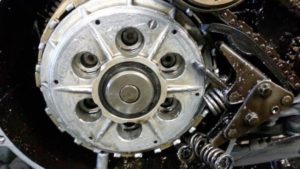
Clutch Carnage: Or, why you need a Tensioner Tamer
Installation Instructions:
First off, I assume you know how to wrench on a bike and that you can follow instructions. It is VERY important to install the Tensioner Tamer correctly, because if you do not, serious damage will result.
Keep a shop manual nearby. Consult it often. Be sure you have the tools above, and again, PLEASE follow my instructions and PLEASE call with any questions. Follow the directions to the T. Do not guess, ask.
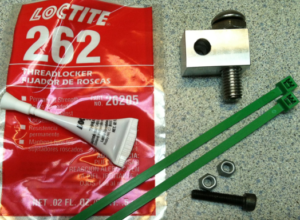
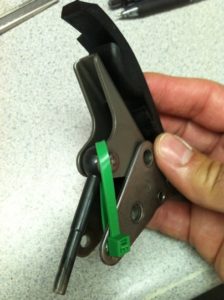
Tensioner Tamer Parts:
-
6061-T6 Aluminum block
-
Gun-Drilled Stainless 10mm Buttonhead Bolt & Locknut
-
Grade 12.8 5mm Allenhead Capscrew & Two all-metal one-use Locknuts
-
Tube of LocTite #262 Permanent Red Threadlock
-
Two GREEN Cableties
-
Not Shown: ExpensiveLightweightShit sticker 🙂
-
Place your bike on it’s sidestand, with the bike on sidestand you do not need to drain the oil.
-
Remove Clutch Cover, scrap gasket surfaces clean on crankcase and clutch cover.
-
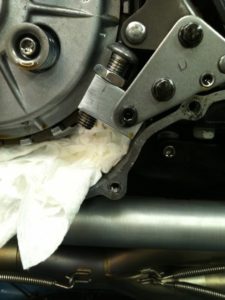
Insert towel in the cavity per picture so nothing gets lost in the motor.
-
-
Remove Starter/Alternator Tensioner by removing the two 8mm hex bolts. Be careful, it’s spring loaded and it’s easy to pinch a finger 🙂
-
Inspect the tensioner pad. It should have a even dark grey Teflon coating. If any black shows through, it’s time to replace it.
-
-
Remove spring from lock tab.
-
-
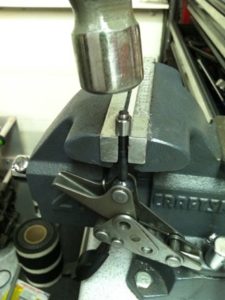
If a Tensioner Fix has been previously installed, it needs to be removed. A vise, hammer and punch, or a pair of ViseGrips loosley around the top and a hammer tap will remove it. If it’s an early maladezo Fix, it may need to be slotted with the Dremel to remove. Be careful, do not nick shaft.
-
-
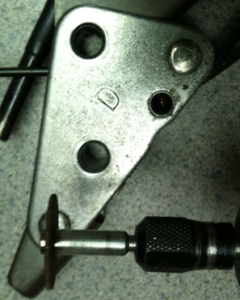
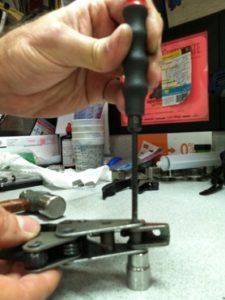
The lower rivet needs the head ground off with the Dremel. Be careful and do not cut into the metal frame. If you stop just short of cutting all the way thru, you can tap it out with a punch and a deep socket.
-
-
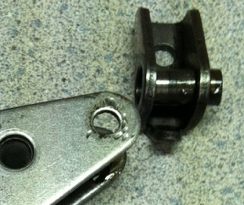
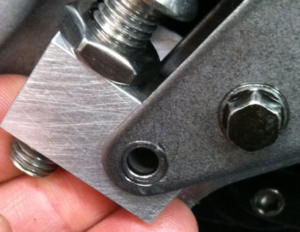
You will need to reuse the spacer inside the lock tab, it pushes out with your finger very easily.
-
-
Clean tensioner with a towel and some brake cleaner. It’s important to get all the oil off so the LocTite grips well on the clean surface when you get to that stage. OIl all over is not good until the install is done.
-
Wrap cable tie around tensioner per the picture, apply blue LocTite (NOT Red!) to the two 8mm hex bolts and reinstall tensioner, torque to 87 Inch/Pounds, cut cable tie and remove pieces.
-
-
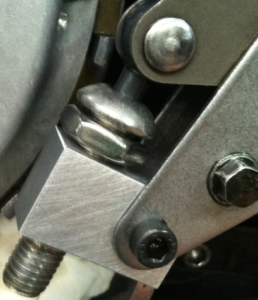
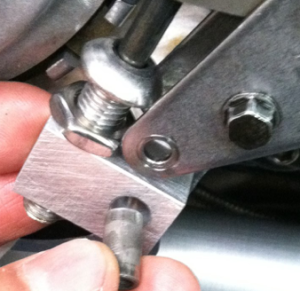
With the 10mm Allen and locknut screwed all the way into the block…See second picture below :-)…Slip the lock tab spacer into the Tensioner Tamer, Slide Tensioner Rod into the Gun-Drilled buttom head bolt, insert black 5mm Allen bolt into the tensioner frame and spacer. Do not install the 5mm lock nut at this time, this is preassembly.
-
-
-
Turn the Gun-Drilled bolt “out” with your fingers, turn it as tight as you can with just your fingers till it is positioned against the “ball” of the tensioner rod. Hold, and turn the locknut with your fingers till it is finger-tight against the aluminum block.
-
-
Remove the black Allen bolt, don’t lose the spacer.
-
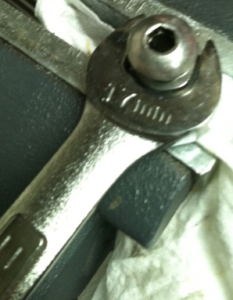
Place aluminum in a vise, or holt with a 14mm wrench or Crescent wrenck. Tighten the 17mm locknut to approximately 15 foot/pounds. “Pretty Tight”, like you would tighten an 8mm handlebar clamp bolt on a ZRX.
-
-
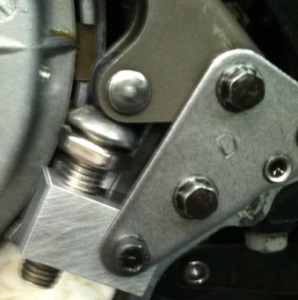
Reinstall assembly and spacer. Insert black Allen bolt.
-
-
Have torque wrench pre-set to 75 inch/pounds.
-
Be sure the bolt, spacer, nut and all are VERY clean, with zero oil on them. Brake cleaner is your friend in this case! This is important to create a great bond with the LocTite.
-
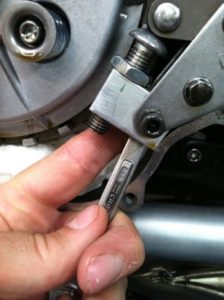
SHAKE tube of 262 LocTite for at least 3 minutes. This is very important.
-
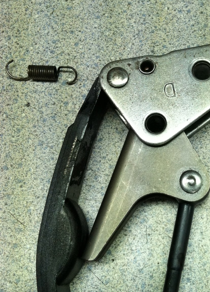
Open tube, apply liberally to One-Use locknut.
-
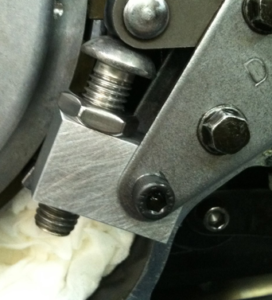
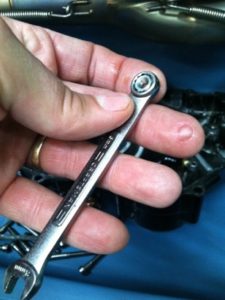
Insert into 8mm box-end wrench per the picture, the wrench is being used backwards to allow you to get it behind the tensioner.
-
-
Install onto black Allen bolt, tighten with 4mm Allen wrench. Immediately Torque to 75 inch/pounds…do not wait as the LocTite starts to cure immediately and it needs to be tight before the hardening starts.
-
REMOVE TOWEL FROM CRANKCASE!!
-
Apply smear of silicone to the front and rear crankcase joints.
-
Install gasket and clutch cover. The front four screws should have a light coat of blue LocTite to prevent leakage. Tighten clutch cover bolts to 87 inch/pounds.
-
Keep the extra One-Use Nut for possible future use.
- Free 30-Day Returns
- Full Refund for Damaged or Incorrect Items
- Guaranteed Delivery or Money Back
- Secure Checkout & Fast Support
Hi, I'm KWICK from ExpensiveLightweightStuff. I have been producing the best starter/alternator fix for the Kawasaki's for way over a decade now. Zero failures, solid engineering, I have sold thousands. Easy for you, or your mechanic to install. On my site are the complete installation instructions at TensionerTamer.com
Fits: ZX10, ZX11C, ZX11D, GPZ750r, GPZ900r, GPZ1000rx, GPZ1100, ZZR1100, ZZR1200, Concours, ZRX1100 & ZRX1200R, using Kawasaki Tensioner part #39170-1059. Check Kawaski parts listings to check part number used on your Kawasaki 🙂
My new Tensioner
Tamer™ fixes not only the symptom of the tensioner arm hitting the
clutch, but also the actual problem of the lock plate slipping in the
first place.
The starter/alternator chain tensioner performs two functions:
1. It tensions the
chain when the motor is running and driving the alternator. In this
regard, my unit performs exactly the same as the spring loaded OEM
tensioner.
2. It tensions the chain when the starter operates.
This unit has an
adjustable, permanently fixed stop. It does not move and it has zero
clearance when installed. Expected normal wear allows less movement than
the stock adjuster does when operating the starter. It won’t need
adjustment. I include an extra one-use locknut for that purpose, but I
have reports of guys and gals running my Tensioner Tamer™ for over
100,000 miles and they have never touched it. You “can” adjust it, but
it is not necessary to do so.
Hy-Vo chains like to
be kept taught when running. The stock spring loaded arm does this on my
setup, just as it does with a stock tensioner.
Manual adjusters do
not have any spring tension and the chain can run loose, or with
inconsistent tension, when the motor is running. This is bad. I’ve
worked on many of the early Honda and Kawasakis from the 70’s-80’s (the
CB750F/900F/CBX for example) with Hy-Vo cam chains and manual cam chain
adjusters. If you weren’t religious about readjusting the lock nut and
letting the adjuster do it’s biz, the chains would wear out very
rapidly.
My New Tensioner
Tamer™ is made from a piece of CNC Machined billet 6061-T6 aluminum with
a gun-drilled Stainless Allen button head bolt, Stainless lock nut, a
12.8 grade anchor bolt with an Aircraft Stainless Locknut and comes with
your own tube of #262 Permanent Red LocTite.
Installation should take less than an hour.
Installation Supplies & Tools Needed:
-
The tools in your tool kit under the seat, or a reasonable facsimile thereof.
-
A really good inch/pound clicker torque wrench that goes down to 50 inch/pounds…OR…a Craftsmen Beam inch/pound torque wrench, they are about $25.00
-
A bottle of blue LocTite (Red comes with the Tensioner, but you’ll also need blue)
-
A couple smears of Silicone Sealant, any color.
-
A can of brake cleaner.
-
A Dremel with a bit to cut metal, like a Carborundum cutting wheel/disc.
-
The shop manual will be handy for those little details.
Clutch Carnage: Or, why you need a Tensioner Tamer
Installation Instructions:
First off, I assume you know how to wrench on a bike and that you can follow instructions. It is VERY important to install the Tensioner Tamer correctly, because if you do not, serious damage will result.
Keep a shop manual nearby. Consult it often. Be sure you have the tools above, and again, PLEASE follow my instructions and PLEASE call with any questions. Follow the directions to the T. Do not guess, ask.
Tensioner Tamer Parts:
-
6061-T6 Aluminum block
-
Gun-Drilled Stainless 10mm Buttonhead Bolt & Locknut
-
Grade 12.8 5mm Allenhead Capscrew & Two all-metal one-use Locknuts
-
Tube of LocTite #262 Permanent Red Threadlock
-
Two GREEN Cableties
-
Not Shown: ExpensiveLightweightShit sticker 🙂
-
Place your bike on it’s sidestand, with the bike on sidestand you do not need to drain the oil.
-
Remove Clutch Cover, scrap gasket surfaces clean on crankcase and clutch cover.
-
Insert towel in the cavity per picture so nothing gets lost in the motor.
-
-
Remove Starter/Alternator Tensioner by removing the two 8mm hex bolts. Be careful, it’s spring loaded and it’s easy to pinch a finger 🙂
-
Inspect the tensioner pad. It should have a even dark grey Teflon coating. If any black shows through, it’s time to replace it.
-
-
Remove spring from lock tab.
-
-
If a Tensioner Fix has been previously installed, it needs to be removed. A vise, hammer and punch, or a pair of ViseGrips loosley around the top and a hammer tap will remove it. If it’s an early maladezo Fix, it may need to be slotted with the Dremel to remove. Be careful, do not nick shaft.
-
-
The lower rivet needs the head ground off with the Dremel. Be careful and do not cut into the metal frame. If you stop just short of cutting all the way thru, you can tap it out with a punch and a deep socket.
-
-
You will need to reuse the spacer inside the lock tab, it pushes out with your finger very easily.
-
-
Clean tensioner with a towel and some brake cleaner. It’s important to get all the oil off so the LocTite grips well on the clean surface when you get to that stage. OIl all over is not good until the install is done.
-
Wrap cable tie around tensioner per the picture, apply blue LocTite (NOT Red!) to the two 8mm hex bolts and reinstall tensioner, torque to 87 Inch/Pounds, cut cable tie and remove pieces.
-
-
With the 10mm Allen and locknut screwed all the way into the block…See second picture below :-)…Slip the lock tab spacer into the Tensioner Tamer, Slide Tensioner Rod into the Gun-Drilled buttom head bolt, insert black 5mm Allen bolt into the tensioner frame and spacer. Do not install the 5mm lock nut at this time, this is preassembly.
-
-
-
Turn the Gun-Drilled bolt “out” with your fingers, turn it as tight as you can with just your fingers till it is positioned against the “ball” of the tensioner rod. Hold, and turn the locknut with your fingers till it is finger-tight against the aluminum block.
-
-
Remove the black Allen bolt, don’t lose the spacer.
-
Place aluminum in a vise, or holt with a 14mm wrench or Crescent wrenck. Tighten the 17mm locknut to approximately 15 foot/pounds. “Pretty Tight”, like you would tighten an 8mm handlebar clamp bolt on a ZRX.
-
-
Reinstall assembly and spacer. Insert black Allen bolt.
-
-
Have torque wrench pre-set to 75 inch/pounds.
-
Be sure the bolt, spacer, nut and all are VERY clean, with zero oil on them. Brake cleaner is your friend in this case! This is important to create a great bond with the LocTite.
-
SHAKE tube of 262 LocTite for at least 3 minutes. This is very important.
-
Open tube, apply liberally to One-Use locknut.
-
Insert into 8mm box-end wrench per the picture, the wrench is being used backwards to allow you to get it behind the tensioner.
-
-
Install onto black Allen bolt, tighten with 4mm Allen wrench. Immediately Torque to 75 inch/pounds…do not wait as the LocTite starts to cure immediately and it needs to be tight before the hardening starts.
-
REMOVE TOWEL FROM CRANKCASE!!
-
Apply smear of silicone to the front and rear crankcase joints.
-
Install gasket and clutch cover. The front four screws should have a light coat of blue LocTite to prevent leakage. Tighten clutch cover bolts to 87 inch/pounds.
-
Keep the extra One-Use Nut for possible future use.
Hi, I'm KWICK from ExpensiveLightweightStuff. I have been producing the best starter/alternator fix for the Kawasaki's for way over a decade now. Zero failures, solid engineering, I have sold thousands. Easy for you, or your mechanic to install. On my site are the complete installation instructions at TensionerTamer.com
Fits: ZX10, ZX11C, ZX11D, GPZ750r, GPZ900r, GPZ1000rx, GPZ1100, ZZR1100, ZZR1200, Concours, ZRX1100 & ZRX1200R, using Kawasaki Tensioner part #39170-1059. Check Kawaski parts listings to check part number used on your Kawasaki 🙂
My new Tensioner
Tamer™ fixes not only the symptom of the tensioner arm hitting the
clutch, but also the actual problem of the lock plate slipping in the
first place.
The starter/alternator chain tensioner performs two functions:
1. It tensions the
chain when the motor is running and driving the alternator. In this
regard, my unit performs exactly the same as the spring loaded OEM
tensioner.
2. It tensions the chain when the starter operates.
This unit has an
adjustable, permanently fixed stop. It does not move and it has zero
clearance when installed. Expected normal wear allows less movement than
the stock adjuster does when operating the starter. It won’t need
adjustment. I include an extra one-use locknut for that purpose, but I
have reports of guys and gals running my Tensioner Tamer™ for over
100,000 miles and they have never touched it. You “can” adjust it, but
it is not necessary to do so.
Hy-Vo chains like to
be kept taught when running. The stock spring loaded arm does this on my
setup, just as it does with a stock tensioner.
Manual adjusters do
not have any spring tension and the chain can run loose, or with
inconsistent tension, when the motor is running. This is bad. I’ve
worked on many of the early Honda and Kawasakis from the 70’s-80’s (the
CB750F/900F/CBX for example) with Hy-Vo cam chains and manual cam chain
adjusters. If you weren’t religious about readjusting the lock nut and
letting the adjuster do it’s biz, the chains would wear out very
rapidly.
My New Tensioner
Tamer™ is made from a piece of CNC Machined billet 6061-T6 aluminum with
a gun-drilled Stainless Allen button head bolt, Stainless lock nut, a
12.8 grade anchor bolt with an Aircraft Stainless Locknut and comes with
your own tube of #262 Permanent Red LocTite.
Installation should take less than an hour.
Installation Supplies & Tools Needed:
-
The tools in your tool kit under the seat, or a reasonable facsimile thereof.
-
A really good inch/pound clicker torque wrench that goes down to 50 inch/pounds…OR…a Craftsmen Beam inch/pound torque wrench, they are about $25.00
-
A bottle of blue LocTite (Red comes with the Tensioner, but you’ll also need blue)
-
A couple smears of Silicone Sealant, any color.
-
A can of brake cleaner.
-
A Dremel with a bit to cut metal, like a Carborundum cutting wheel/disc.
-
The shop manual will be handy for those little details.
Clutch Carnage: Or, why you need a Tensioner Tamer
Installation Instructions:
First off, I assume you know how to wrench on a bike and that you can follow instructions. It is VERY important to install the Tensioner Tamer correctly, because if you do not, serious damage will result.
Keep a shop manual nearby. Consult it often. Be sure you have the tools above, and again, PLEASE follow my instructions and PLEASE call with any questions. Follow the directions to the T. Do not guess, ask.
Tensioner Tamer Parts:
-
6061-T6 Aluminum block
-
Gun-Drilled Stainless 10mm Buttonhead Bolt & Locknut
-
Grade 12.8 5mm Allenhead Capscrew & Two all-metal one-use Locknuts
-
Tube of LocTite #262 Permanent Red Threadlock
-
Two GREEN Cableties
-
Not Shown: ExpensiveLightweightShit sticker 🙂
-
Place your bike on it’s sidestand, with the bike on sidestand you do not need to drain the oil.
-
Remove Clutch Cover, scrap gasket surfaces clean on crankcase and clutch cover.
-
Insert towel in the cavity per picture so nothing gets lost in the motor.
-
-
Remove Starter/Alternator Tensioner by removing the two 8mm hex bolts. Be careful, it’s spring loaded and it’s easy to pinch a finger 🙂
-
Inspect the tensioner pad. It should have a even dark grey Teflon coating. If any black shows through, it’s time to replace it.
-

-
Remove spring from lock tab.
-
-
If a Tensioner Fix has been previously installed, it needs to be removed. A vise, hammer and punch, or a pair of ViseGrips loosley around the top and a hammer tap will remove it. If it’s an early maladezo Fix, it may need to be slotted with the Dremel to remove. Be careful, do not nick shaft.
-
-
The lower rivet needs the head ground off with the Dremel. Be careful and do not cut into the metal frame. If you stop just short of cutting all the way thru, you can tap it out with a punch and a deep socket.
-
-
You will need to reuse the spacer inside the lock tab, it pushes out with your finger very easily.
-
-
Clean tensioner with a towel and some brake cleaner. It’s important to get all the oil off so the LocTite grips well on the clean surface when you get to that stage. OIl all over is not good until the install is done.
-
Wrap cable tie around tensioner per the picture, apply blue LocTite (NOT Red!) to the two 8mm hex bolts and reinstall tensioner, torque to 87 Inch/Pounds, cut cable tie and remove pieces.
-
-
With the 10mm Allen and locknut screwed all the way into the block…See second picture below :-)…Slip the lock tab spacer into the Tensioner Tamer, Slide Tensioner Rod into the Gun-Drilled buttom head bolt, insert black 5mm Allen bolt into the tensioner frame and spacer. Do not install the 5mm lock nut at this time, this is preassembly.
-

-
-
Turn the Gun-Drilled bolt “out” with your fingers, turn it as tight as you can with just your fingers till it is positioned against the “ball” of the tensioner rod. Hold, and turn the locknut with your fingers till it is finger-tight against the aluminum block.
-
-
Remove the black Allen bolt, don’t lose the spacer.
-
Place aluminum in a vise, or holt with a 14mm wrench or Crescent wrenck. Tighten the 17mm locknut to approximately 15 foot/pounds. “Pretty Tight”, like you would tighten an 8mm handlebar clamp bolt on a ZRX.
-
-
Reinstall assembly and spacer. Insert black Allen bolt.
-
-
Have torque wrench pre-set to 75 inch/pounds.
-
Be sure the bolt, spacer, nut and all are VERY clean, with zero oil on them. Brake cleaner is your friend in this case! This is important to create a great bond with the LocTite.
-
SHAKE tube of 262 LocTite for at least 3 minutes. This is very important.
-
Open tube, apply liberally to One-Use locknut.
-
Insert into 8mm box-end wrench per the picture, the wrench is being used backwards to allow you to get it behind the tensioner.
-
-
Install onto black Allen bolt, tighten with 4mm Allen wrench. Immediately Torque to 75 inch/pounds…do not wait as the LocTite starts to cure immediately and it needs to be tight before the hardening starts.
-
REMOVE TOWEL FROM CRANKCASE!!
-
Apply smear of silicone to the front and rear crankcase joints.
-
Install gasket and clutch cover. The front four screws should have a light coat of blue LocTite to prevent leakage. Tighten clutch cover bolts to 87 inch/pounds.
-
Keep the extra One-Use Nut for possible future use.
- Brand: ExpensiveLightweightStuff.com
- Compatible Make: Kawasaki
- Machine Type: ZRX1100, ZRX1200
- Manufacturer Part Number: Tensioner Tamer
- Material: Billet
- Vintage Part: No
- Compatible Year: 2018, 2017, 2016, 2015, 2014, 2013, 2012, 2011, 2010, 2009, 2008, 2007, 2006, 2005, 2004, 2003, 2002, 2001, 2000, 1999, 1998, 1997
- Placement on Vehicle: Right
Processing Time
- We process and ship orders Monday through Friday, excluding holidays.
- Most orders are processed within 1–3 business days, depending on product availability.
- Processing time does not include delivery time, which varies based on your location and the product’s shipping origin.
Shipping Coverage
We currently ship to addresses within the United States only.
Products may ship from:
- Our U.S. warehouses, or
- Our international fulfillment centers (including Korea, Japan, China, Australia, Mexico, Canada, the United Kingdom, and the EU).
Each product page clearly displays the “Ships From” location before checkout.
Shipping Methods & Estimated Delivery
| Shipping Method | Estimated Delivery | Cost |
|---|---|---|
| Free Shipping (US) | 5–10 business days | Free, available on eligible items |
| Standard Shipping (US to US by Item) | 5–10 business days | $5.95 for the first item, $3.00 each additional |
| Standard Shipping (From US Warehouse by Weight) | 3–7 business days | Starts at $5.95, increasing by $2 for every additional 4 oz (0.25 lb) up to 1 lb, then by $4 for each additional pound beyond 1 lb. |
| Extended Delivery (Ships from Overseas Warehouse) | 10–20 business days | $14.50 for the first item, $2.00 each additional |
Shipping costs vary by product weight, quantity and origin. Exact rates and delivery estimates are displayed on each product page and confirmed during checkout.
Free Shipping
We offer free standard shipping on select products or during promotional periods. Availability of free shipping will be displayed on the product page and at checkout.
Carriers
We primarily use USPS and UPS for U.S. deliveries. Items shipped from international warehouses may be handled by partner carriers depending on the country of origin.
Import Duties & Taxes
All import duties and taxes for goods imported into the United States are included in the product price. There are no hidden fees or additional charges at checkout.
Tracking & Notifications
Every order is fully trackable. You will receive a tracking number via email once your order ships. If your order ships in multiple packages, each package will have its own tracking number. If you don’t receive a shipping confirmation immediately, your order is still being processed and will arrive within the estimated timeframe shown at checkout.
You can track your shipment anytime using the Track Your Order page on our website.
Order Changes & Cancellations
If you need to modify or cancel an order, please contact our customer support team as soon as possible. Orders can only be canceled before they ship. Once shipped, cancellations are not possible, but you may request a return after the item is delivered.
Contact: support@ibspot.com
Item Not Received
If your tracking number shows “Delivered” but you haven’t received your package:
- Check with your local USPS or UPS office.
- Confirm that the shipping address provided was correct.
- If the issue remains unresolved, contact support@ibspot.com for assistance.
Damaged or Lost Parcels
If your package arrives damaged or fails to arrive, please contact us immediately. For deliveries to P.O. boxes, ibspot is not responsible for damage caused by weather, temperature, or theft.
Customer Support
For any questions about shipping, tracking, or delivery, our customer support team is here to help.
Email: support@ibspot.com
We’re always happy to help.
Please read our policy carefully before making a purchase.
We aim to ensure every customer has a smooth and transparent experience with ibspot.com.
Order Cancellation Policy
Customers may request to cancel an order before it has been shipped.
Once the package has been shipped, cancellations are no longer possible; however, you may still request a return after receiving your order.
How to Request a Cancellation
You can contact us through:
- Email: support@ibspot.com
- Contact Form: Submit a request through our Contact Us page
Please submit your cancellation request as soon as possible after placing the order to allow us to process it before shipment.
Return Policy
We accept returns for most items within 30 days of delivery for a full refund.
To be eligible for a return:
- The item must be unused, in the same condition as received, and in its original packaging.
- A tracking number must be provided to confirm the return shipment.
Non-Returnable Items
Certain products cannot be returned, including:
- Perishable goods (for example, food, flowers, newspapers, magazines)
- Intimate or sanitary goods
- Hazardous materials or flammable liquids/gases
- Gift cards
- Downloadable software
- Some health and personal care items
Partial Refunds (If Applicable)
Partial refunds may be granted in specific situations, such as:
- Books with obvious signs of use
- Opened CDs, DVDs, software, or vinyl records
- Items not in their original condition, damaged, or missing parts not due to our error
- Items returned more than 30 days after delivery
How to Return an Item
To initiate a return, please contact us at support@ibspot.com with your order number and details about the product you wish to return.
Our team will provide you with return instructions and a prepaid return label.
Shipping Cost for Returns
Please contact us before returning any item.
We will provide a free return shipping label.
If a return is sent back without prior contact or without our provided label, we cannot be held responsible for return shipping costs.
For items valued over $75, we recommend using a trackable shipping service or purchasing shipping insurance.
We cannot guarantee that we will receive your returned item if shipped independently.
Refund Processing
Once your return is received and inspected:
- In-store returns are refunded to the original form of payment or issued as a gift card.
- Mail-in returns using our prepaid label are refunded to the original payment method within 3–5 business days after we receive your return.
Please allow:
- 5–7 business days for the return to reach our Returns Center.
- An additional 3–10 business days for your bank to post the refund to your account.
Damages, Issues & Claims
Please inspect your order immediately upon receipt.
If you receive a defective, damaged, or incorrect item, contact us right away at support@ibspot.com.
We’ll evaluate the issue promptly and make it right.
Product Claims
Before purchasing, please review product details carefully.
If there is a problem with your order upon arrival, visit our Support Center or contact us directly to arrange return shipping or replacement.
Exchanges
We do not process direct exchanges.
The fastest way to get what you need is to return the original item and place a new order once your return is accepted.
Return Address
IBSPOT Return Center
15 Sawmill Ln
Dover Plains, NY 12522
United States
Customer Support
Our support team is available 24/7 to assist with cancellations, returns, or general inquiries.
Email: support@ibspot.com
Contact Form: Contact Us page
Oops!
Sorry, it looks like some products are not available in selected quantity.